Introduction
MeetID is used to create and conduct secure, authenticated video meetings in Zoom. This knowledge base describes how to add MeetID, use the app to create secure meetings, and remove the app from your Zoom account.

Prerequisites
To use MeetID, both the meeting host and participants need access to the tools required for the meeting and the authentication method used.
Meeting Host
- The meeting host needs to have Zoom installed.
- The Zoom client needs to be updated and meet Zoom’s current system requirements.
- The meeting host needs to be logged into Zoom with the account where MeetID will be used.
- MeetID needs to be available to the user via the organization’s Zoom account.
- The meeting host needs to have access to Apps in Zoom Workplace.
Participants
- The participant needs a web browser supported by Zoom’s web-based meeting flow.
- The participant needs access to the authentication method used for the meeting, such as BankID.
- The participant needs to be able to open the link in the invitation via email or SMS.
- The participant needs to allow camera and microphone access if the browser requests it.
Add MeetID
To add MeetID, the app must first have been made available by your organization. You also need to be logged into Zoom with the account where the app will be used and have received an installation link from your administrator. Then follow the steps below.
If you do not see the Apps menu option in Zoom, you can read more in the Troubleshooting section further down the page.
- Open the installation link you received from your administrator.
- Click Add or Authorize.
- Approve the requested permissions.
- Open Zoom Workplace.
- Verify that MeetID is listed under Apps.
- If the app does not appear, restart the Zoom client and log in again.
Use MeetID
MeetID is used to create and manage secure authenticated meetings in Zoom. As a meeting host, you work within Zoom, but the meeting itself and the participant flow are handled via MeetID in Zoom to ensure that the correct individuals gain access to the meeting.
In MeetID, you can create a secure meeting, add participants, and send meeting invitations. The participant then opens their invitation link in a web browser and authenticates themselves before the meeting using the e-identification methods provided by your organization, such as BankID. Once authentication is approved, the participant can join the Zoom meeting.
To use MeetID, the meeting host needs access to Zoom and MeetID. The participant needs a web browser and access to the authentication method required for the meeting.
Open MeetID in Zoom
Once MeetID has been added to Zoom, open the app directly from the Zoom application.
- Start Zoom.
- Click Apps in the toolbar.
- Locate and open MeetID.
- If MeetID does not appear, verify that the app is installed on the correct Zoom account and that your organization has granted you access.
- If the Apps menu option is missing, you can read more in the Troubleshooting section further down the page.
Create a Secure Meeting
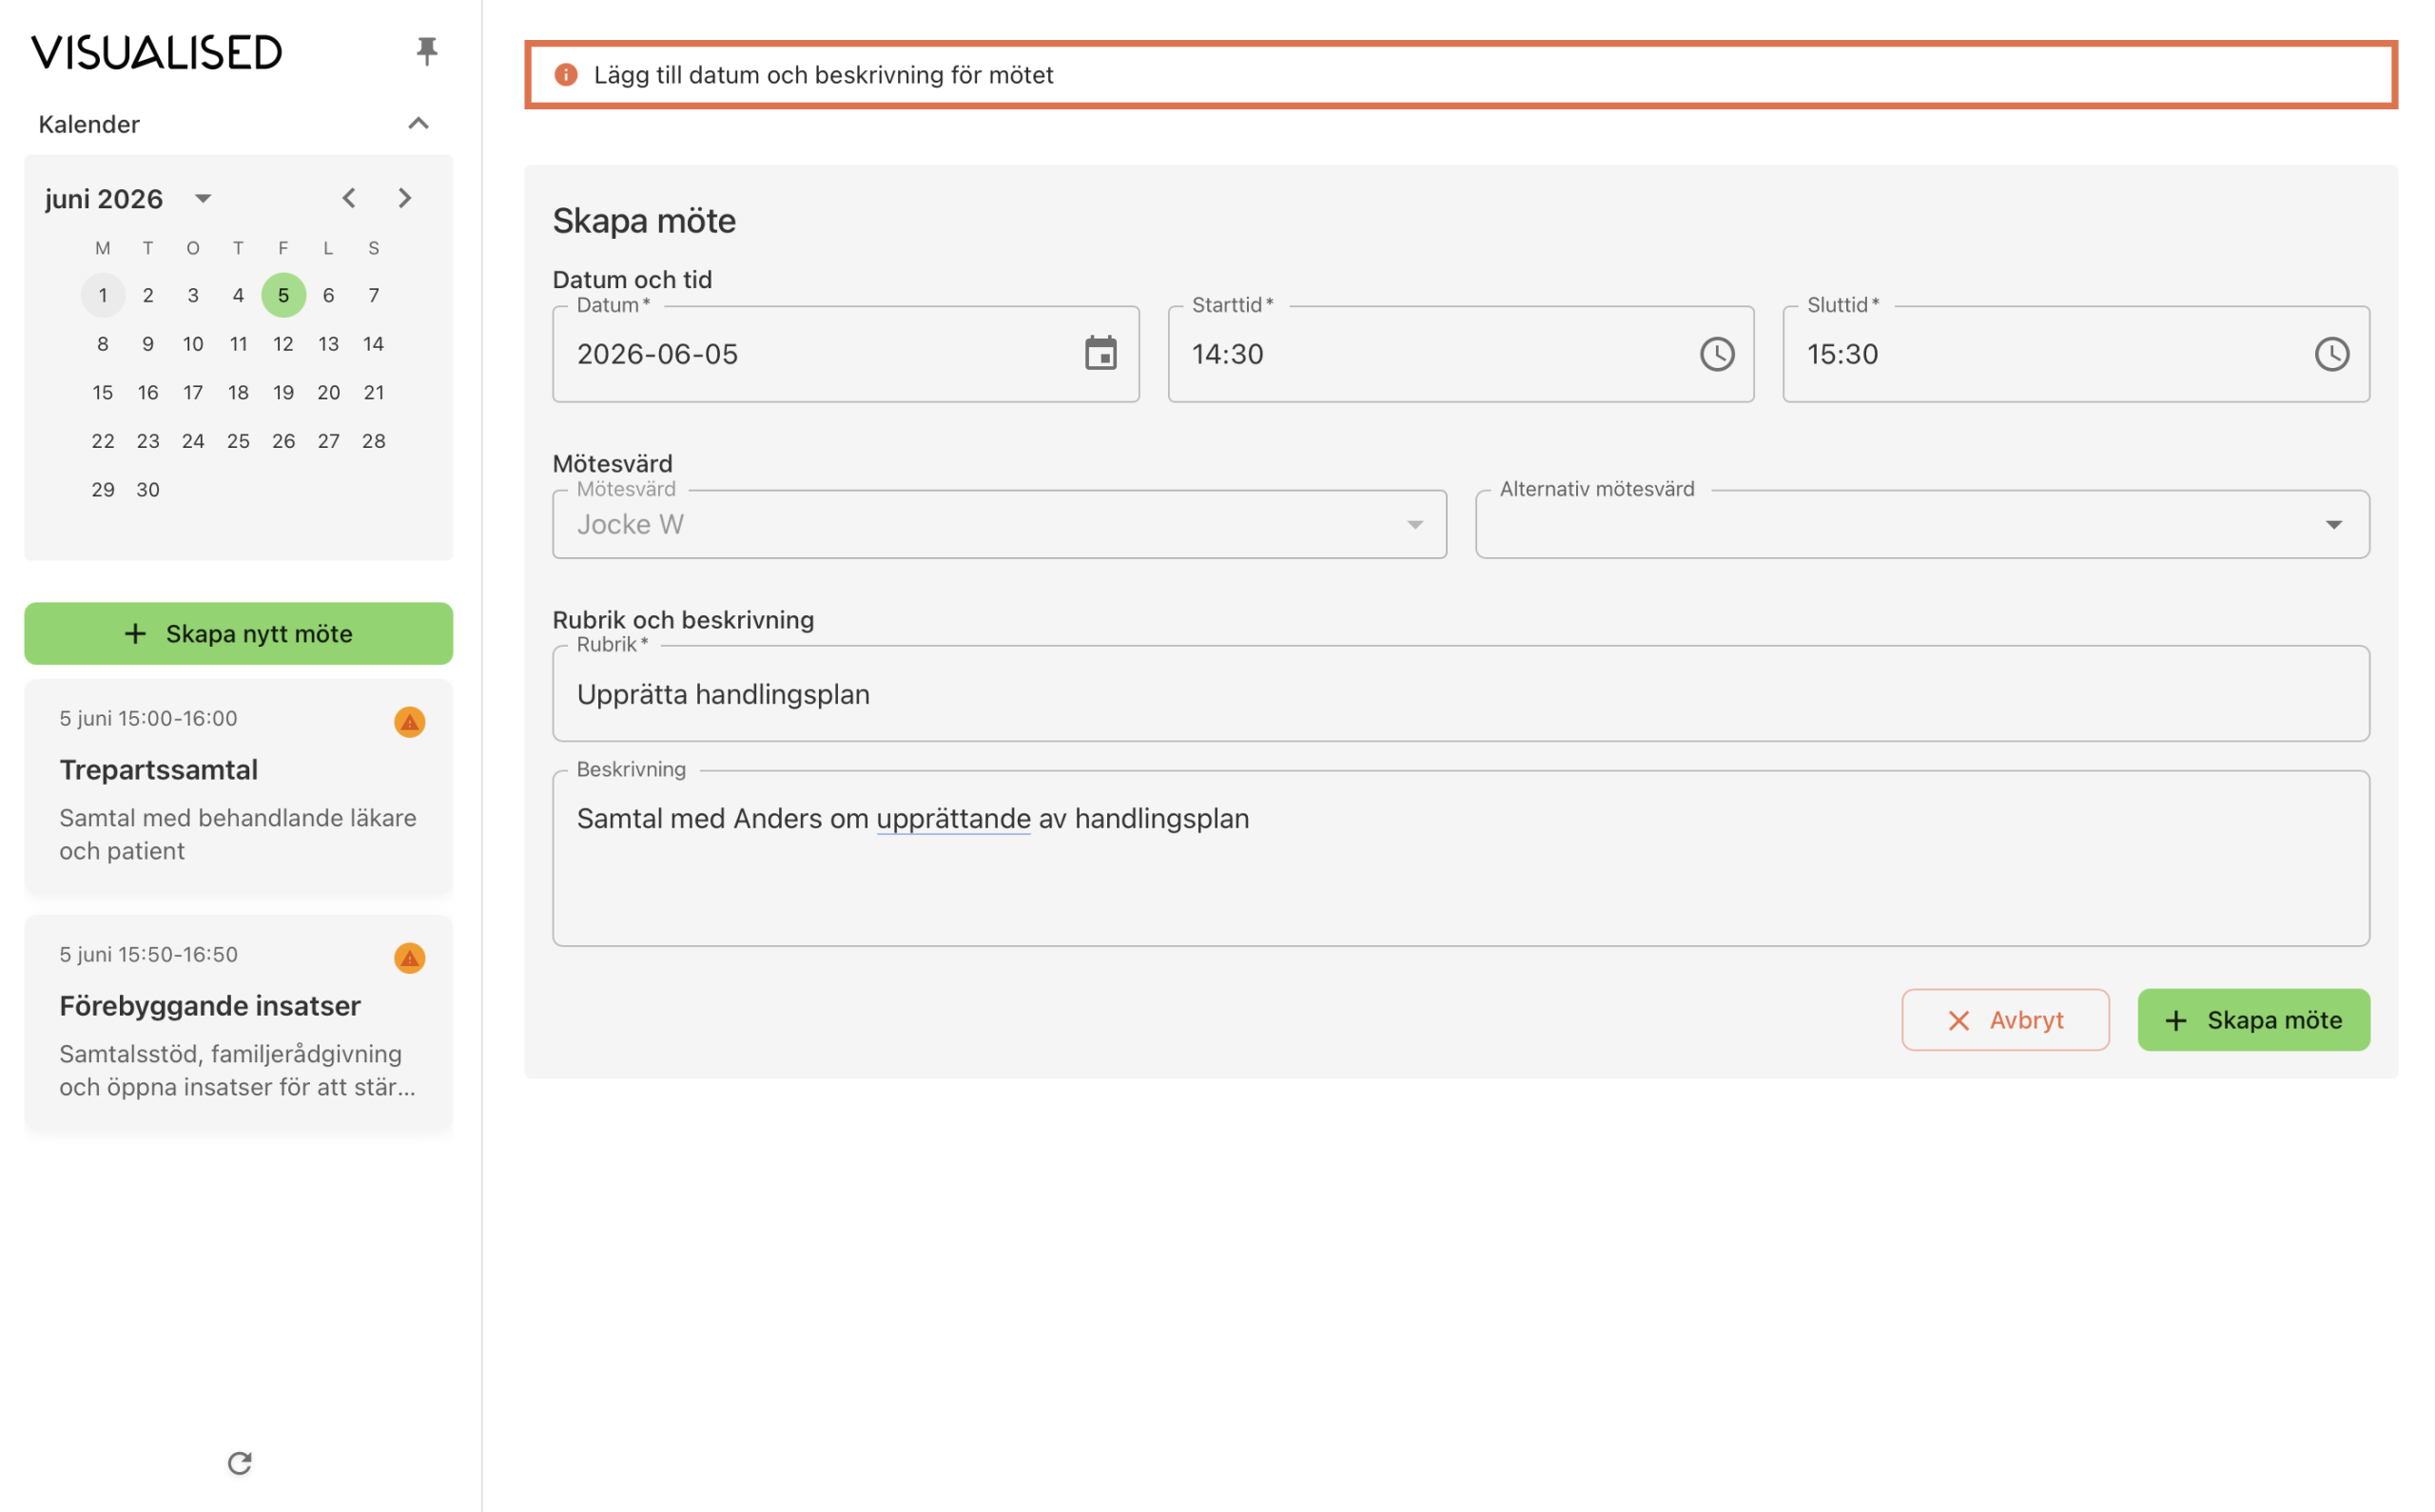
Once you have opened MeetID, you can create a new secure meeting directly in the app. The meeting is created with you as the meeting host. In the next step, participants and invitations will be added to the meeting. See the image below.
- Select the meeting date in the date picker on the left. The date picker is automatically set to today’s date.
- Click Create new meeting on the left below the date picker.
- Adjust the date if necessary.
- Enter the start and end time for the meeting.
- You are automatically selected as the meeting host. If the meeting should have an alternative host, select them. The alternative host automatically receives a booking in their calendar.
- Enter a title and any description for the meeting. The title and description are used as internal notes and are not shared with the participant.
- Click Create meeting to save the meeting.
- Created meetings can be found in the section on the left.
Add Participants
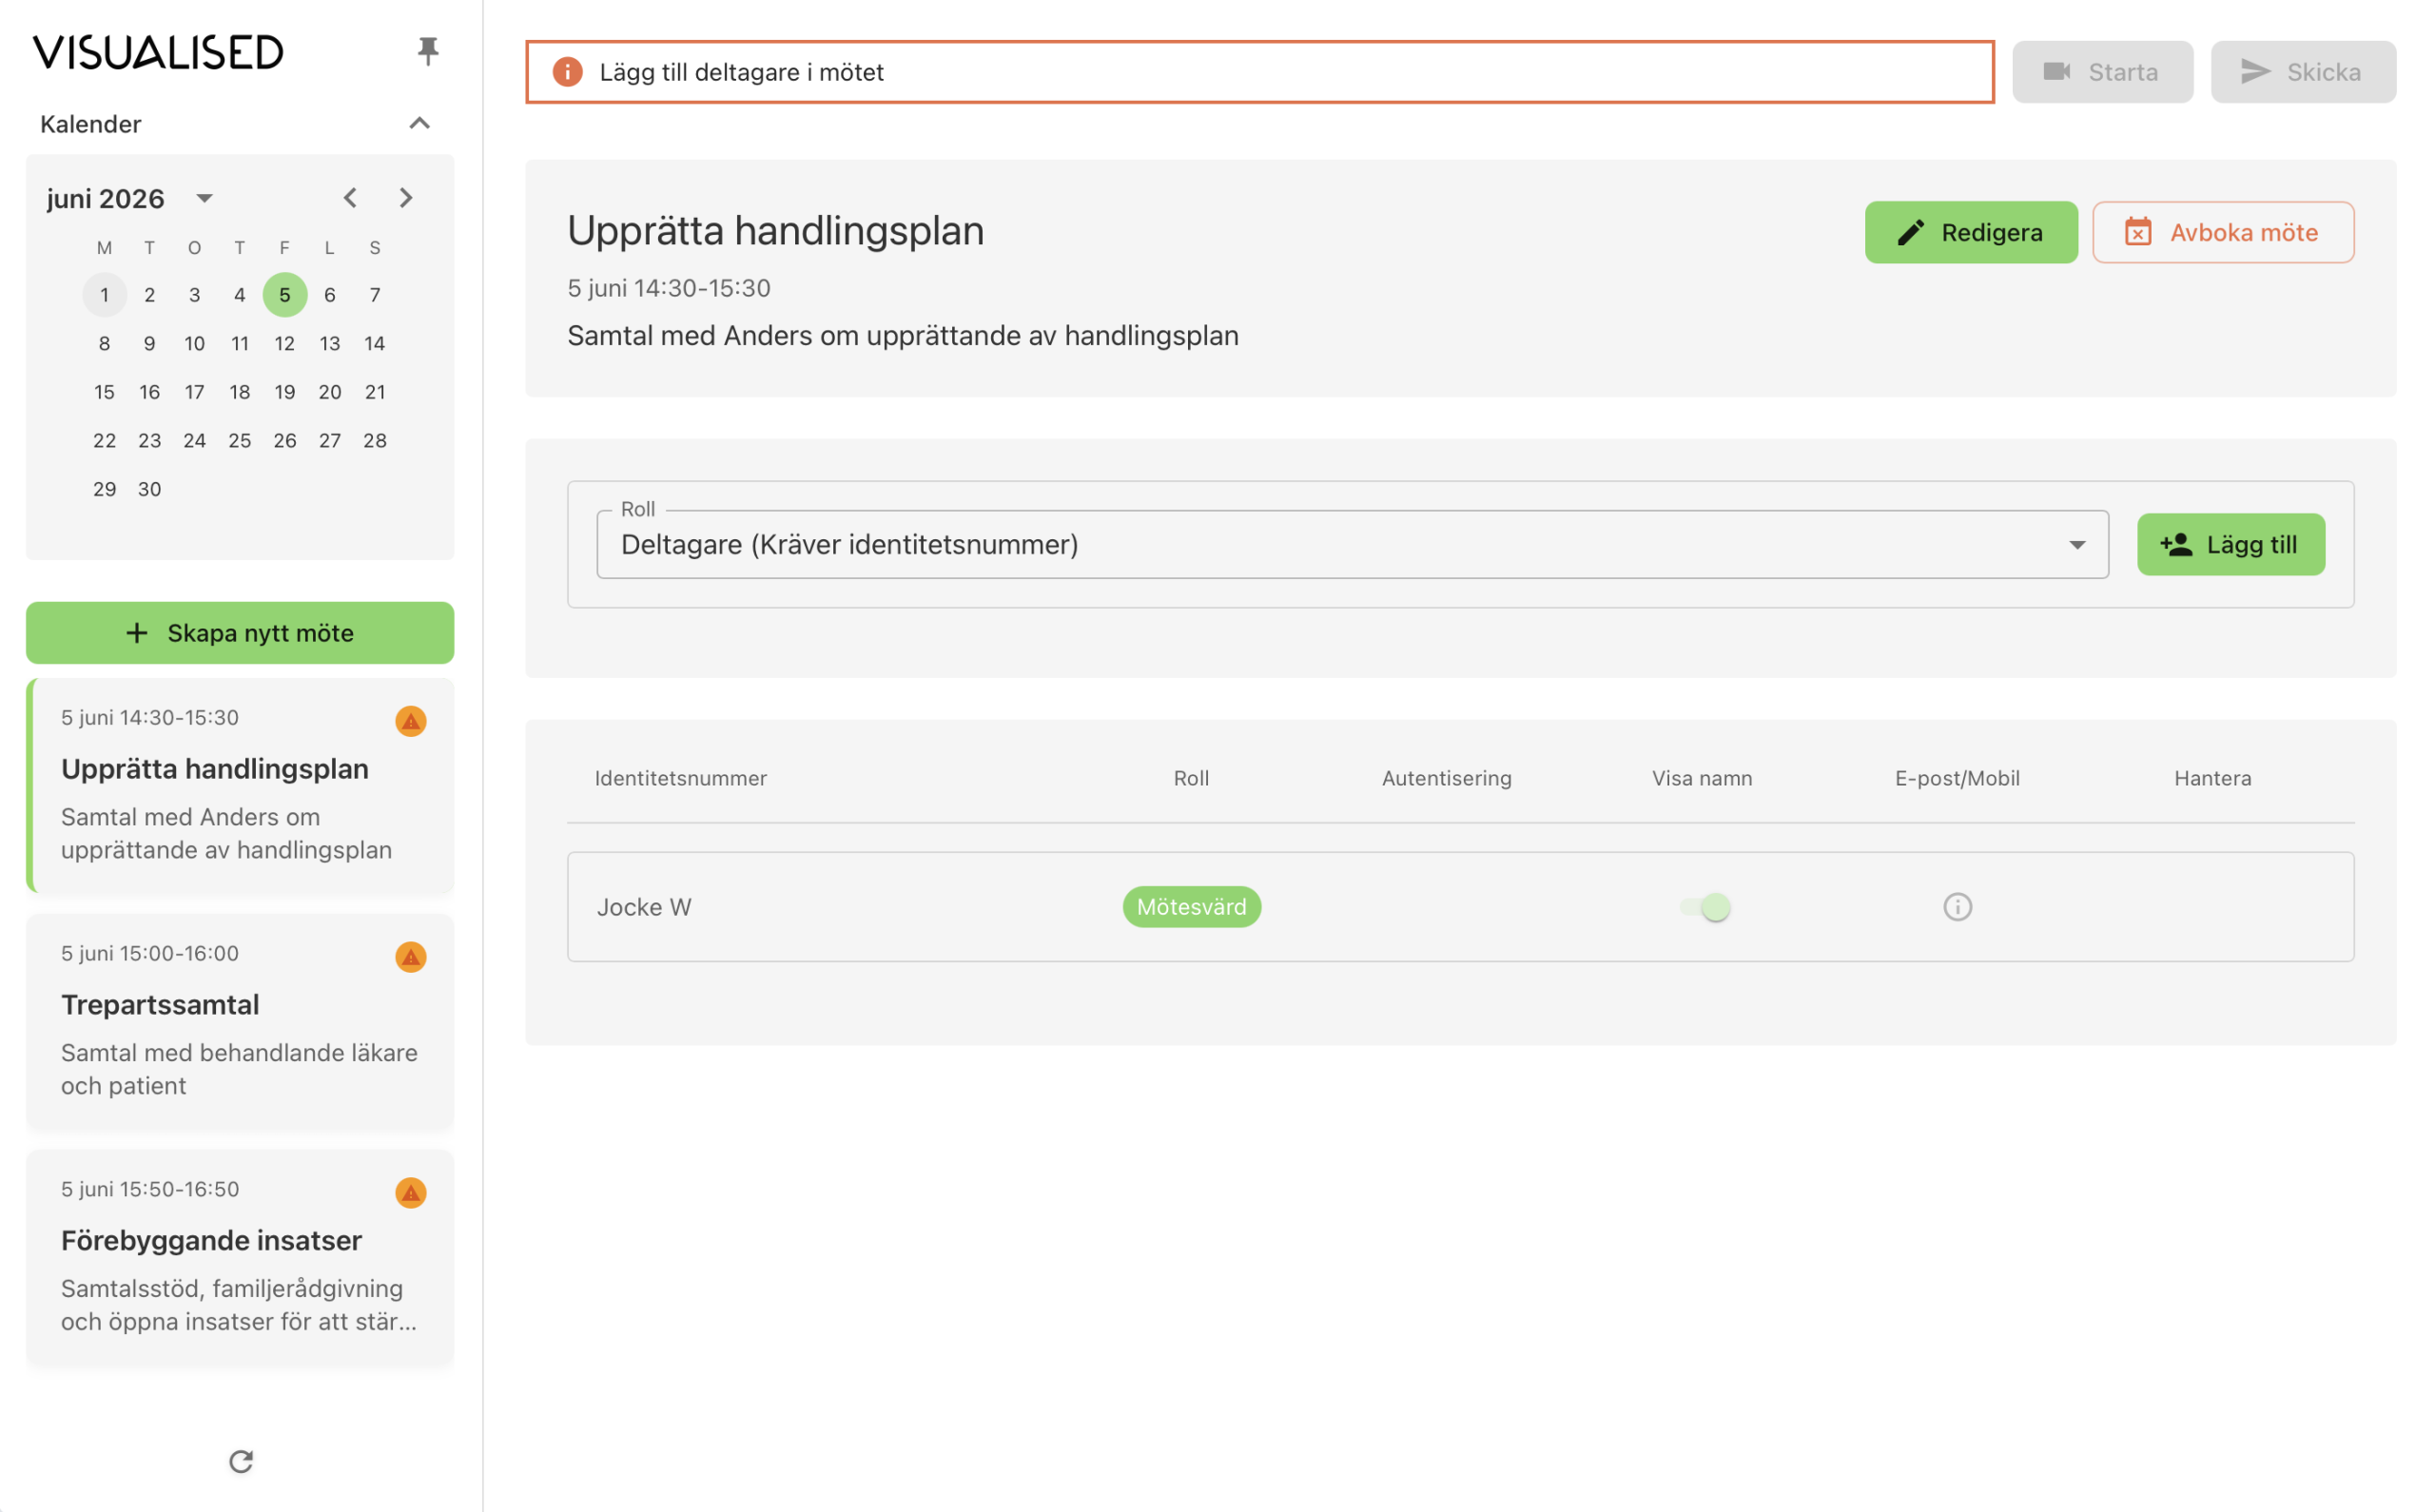
Once the meeting has been created, you need to add the individuals who will participate. In MeetID, you first select the participant’s role and then fill in the required information for that role. See the image below.
There are two types of participant roles:
Affected person
The person the meeting concerns, for example, a user, patient, or client. This role requires the identity number to be provided in advance.
Contributing contact
A person who will participate in the meeting, for example, a foster parent, colleague, or healthcare professional. The person authenticates with e-identification, but the identity number does not need to be known in advance.
Everyone participating in the meeting, regardless of role, needs to identify themselves with e-identification before being admitted to the meeting.
Add Affected Person
- Select the role Affected person.
- Click Add.
- Enter the personal identity number.
- MeetID performs a lookup against SPAR to verify the identity.
- If the person has protected personal data, the display name is automatically hidden in the meeting. Instead, the name Meeting Participant is shown.
- You can choose whether the participant’s name should be displayed or hidden by adjusting Show name.
- Specify the type of e-identification to be used.
- Choose whether the invitation should be sent via email or to a mobile number.
- Click Add.
Add Contributing Contact
- Select the role Contributing contact.
- Click Add.
- Enter the first name (using the given name) and last name.
- Specify the type of e-identification to be used.
- Choose whether the invitation should be sent via email or to a mobile number.
- Click Add.
Send Meeting Invitation
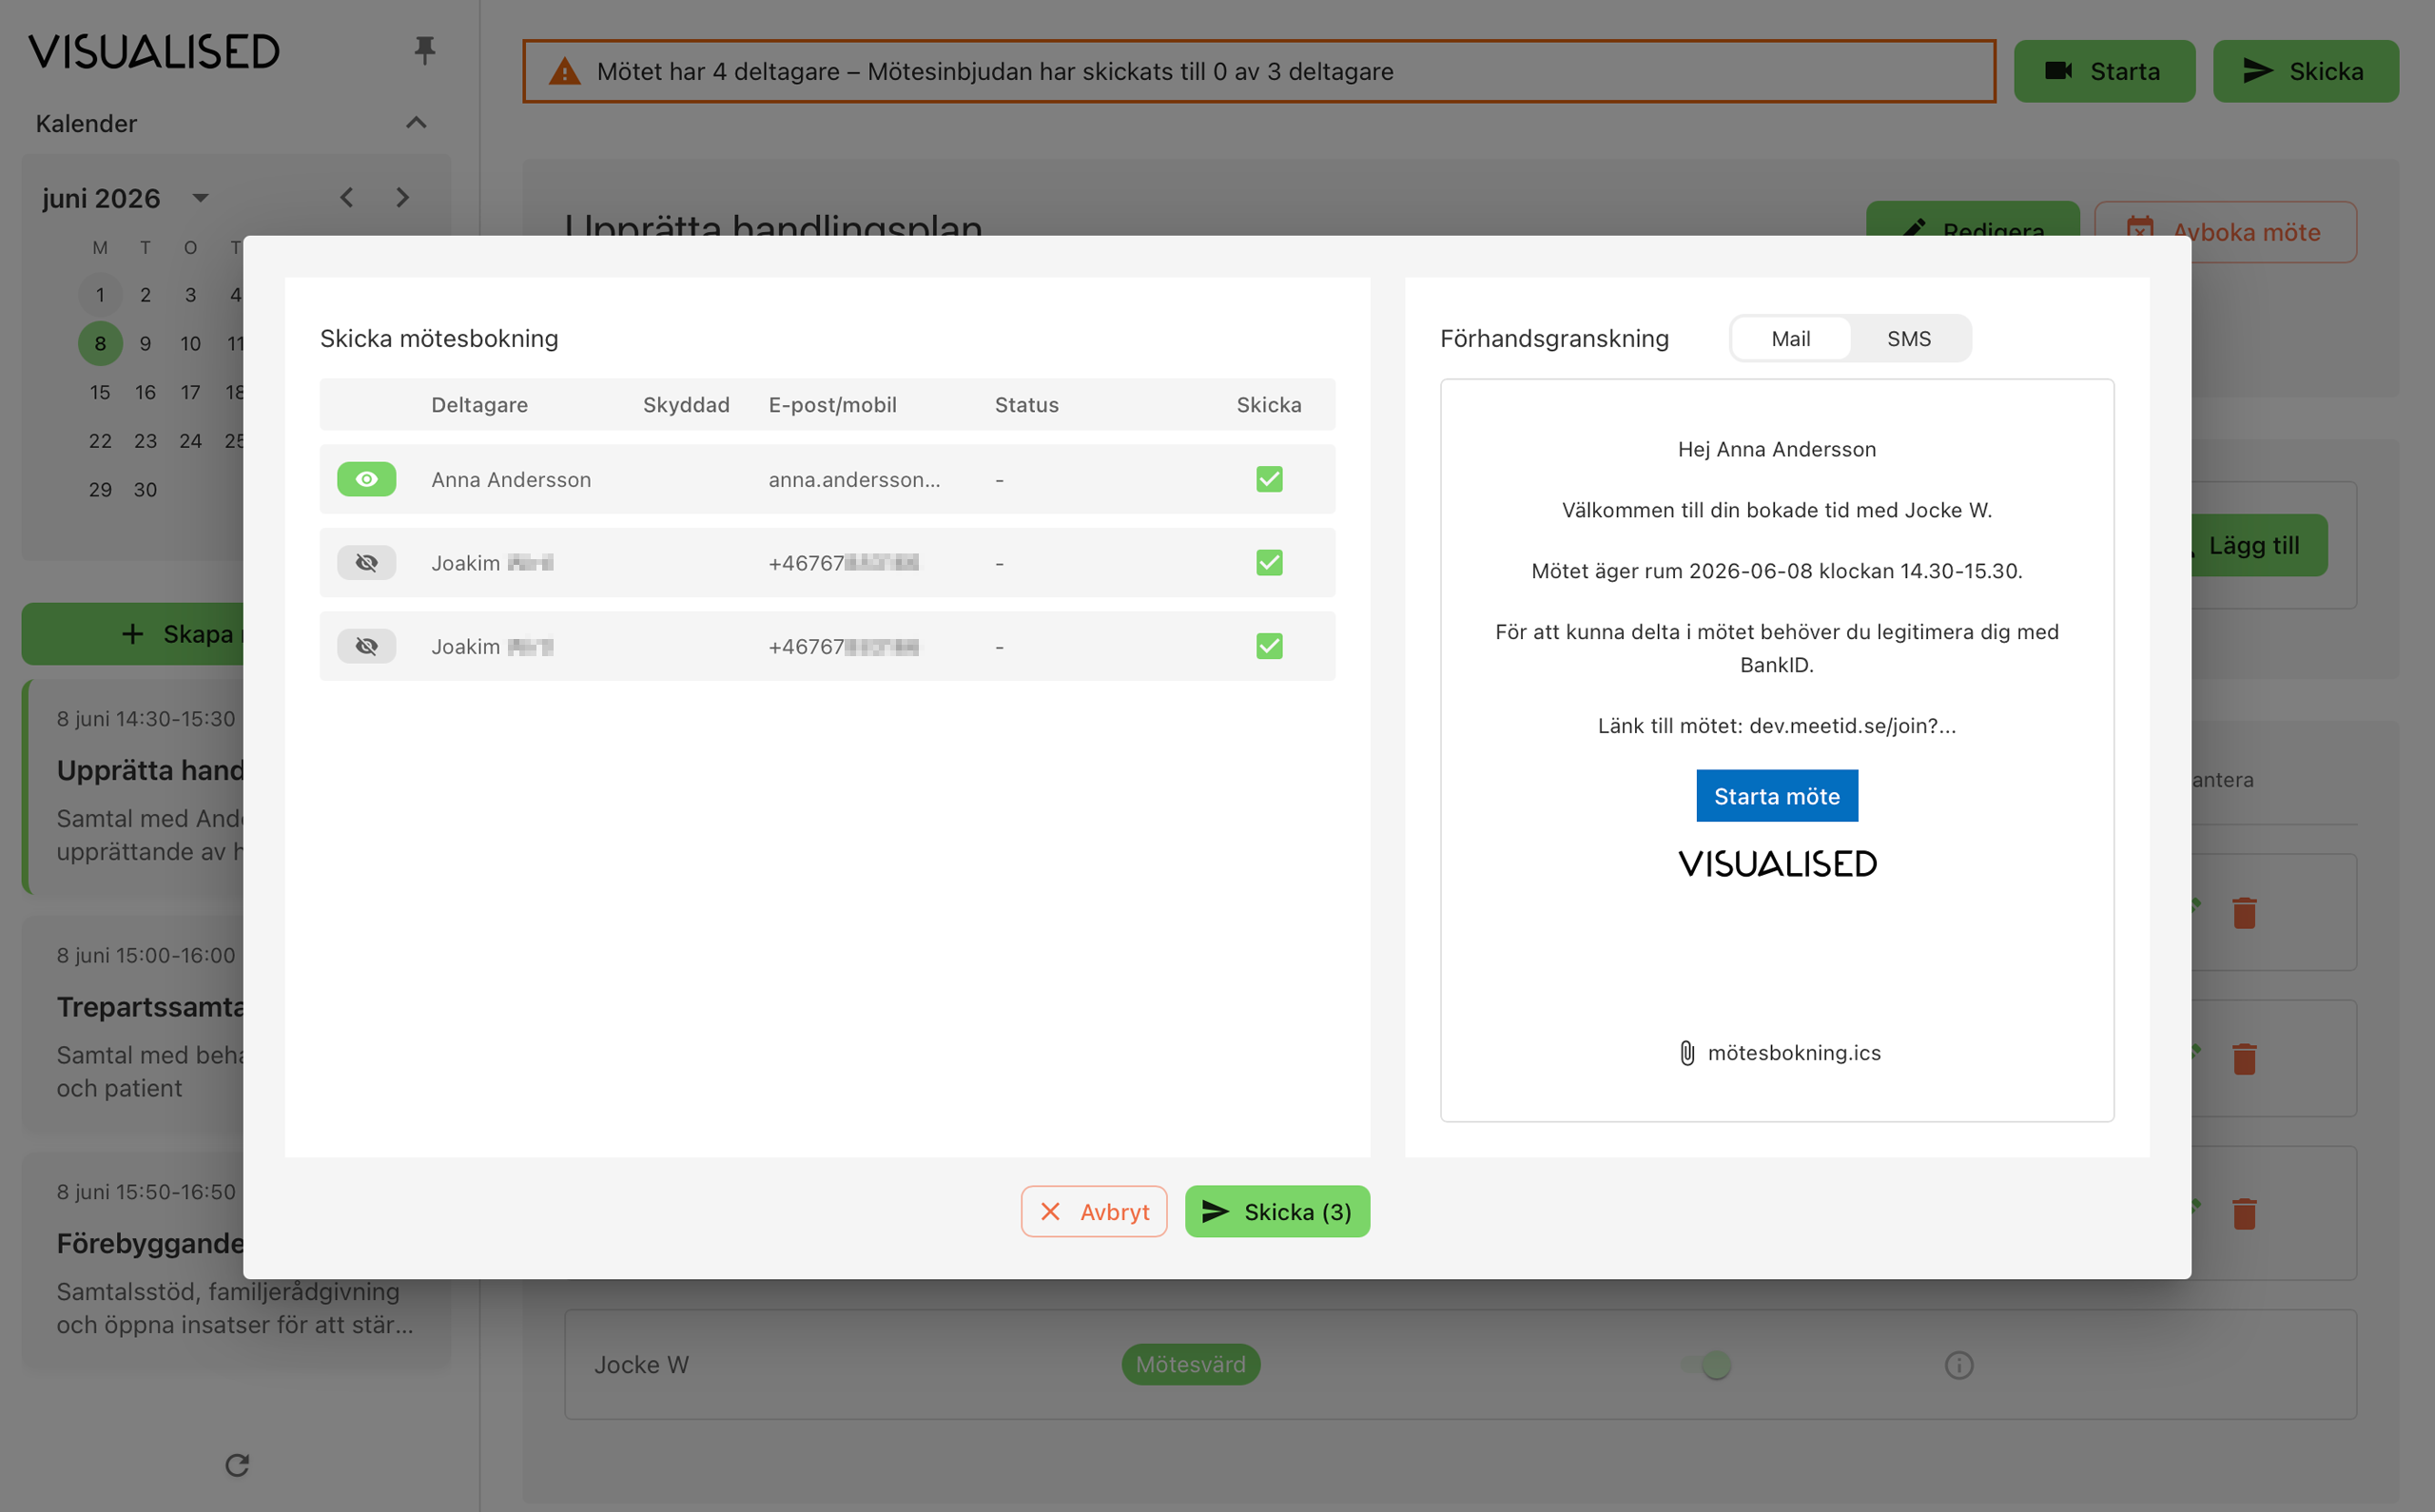
Once participants have been added to the meeting, you can send the meeting invitation from MeetID. The invitation contains the link the participant uses to authenticate and join the meeting. See the image below.
- Click Send in the upper right corner.
- In the dialog box that opens, you will get an overview of the participants who can receive an invitation.
- Participants who have not yet received an invitation are automatically selected.
- If you want to send a reminder to a participant who has already received an invitation, you need to re-select that participant.
- Review the invitation before sending it. You can preview both email and SMS.
- If necessary, check the participant’s contact information, status of previous mailings, and whether the participant has a protected identity.
- Click Send when you are done. The invitation will then be sent to the selected participants.
Join as Participant
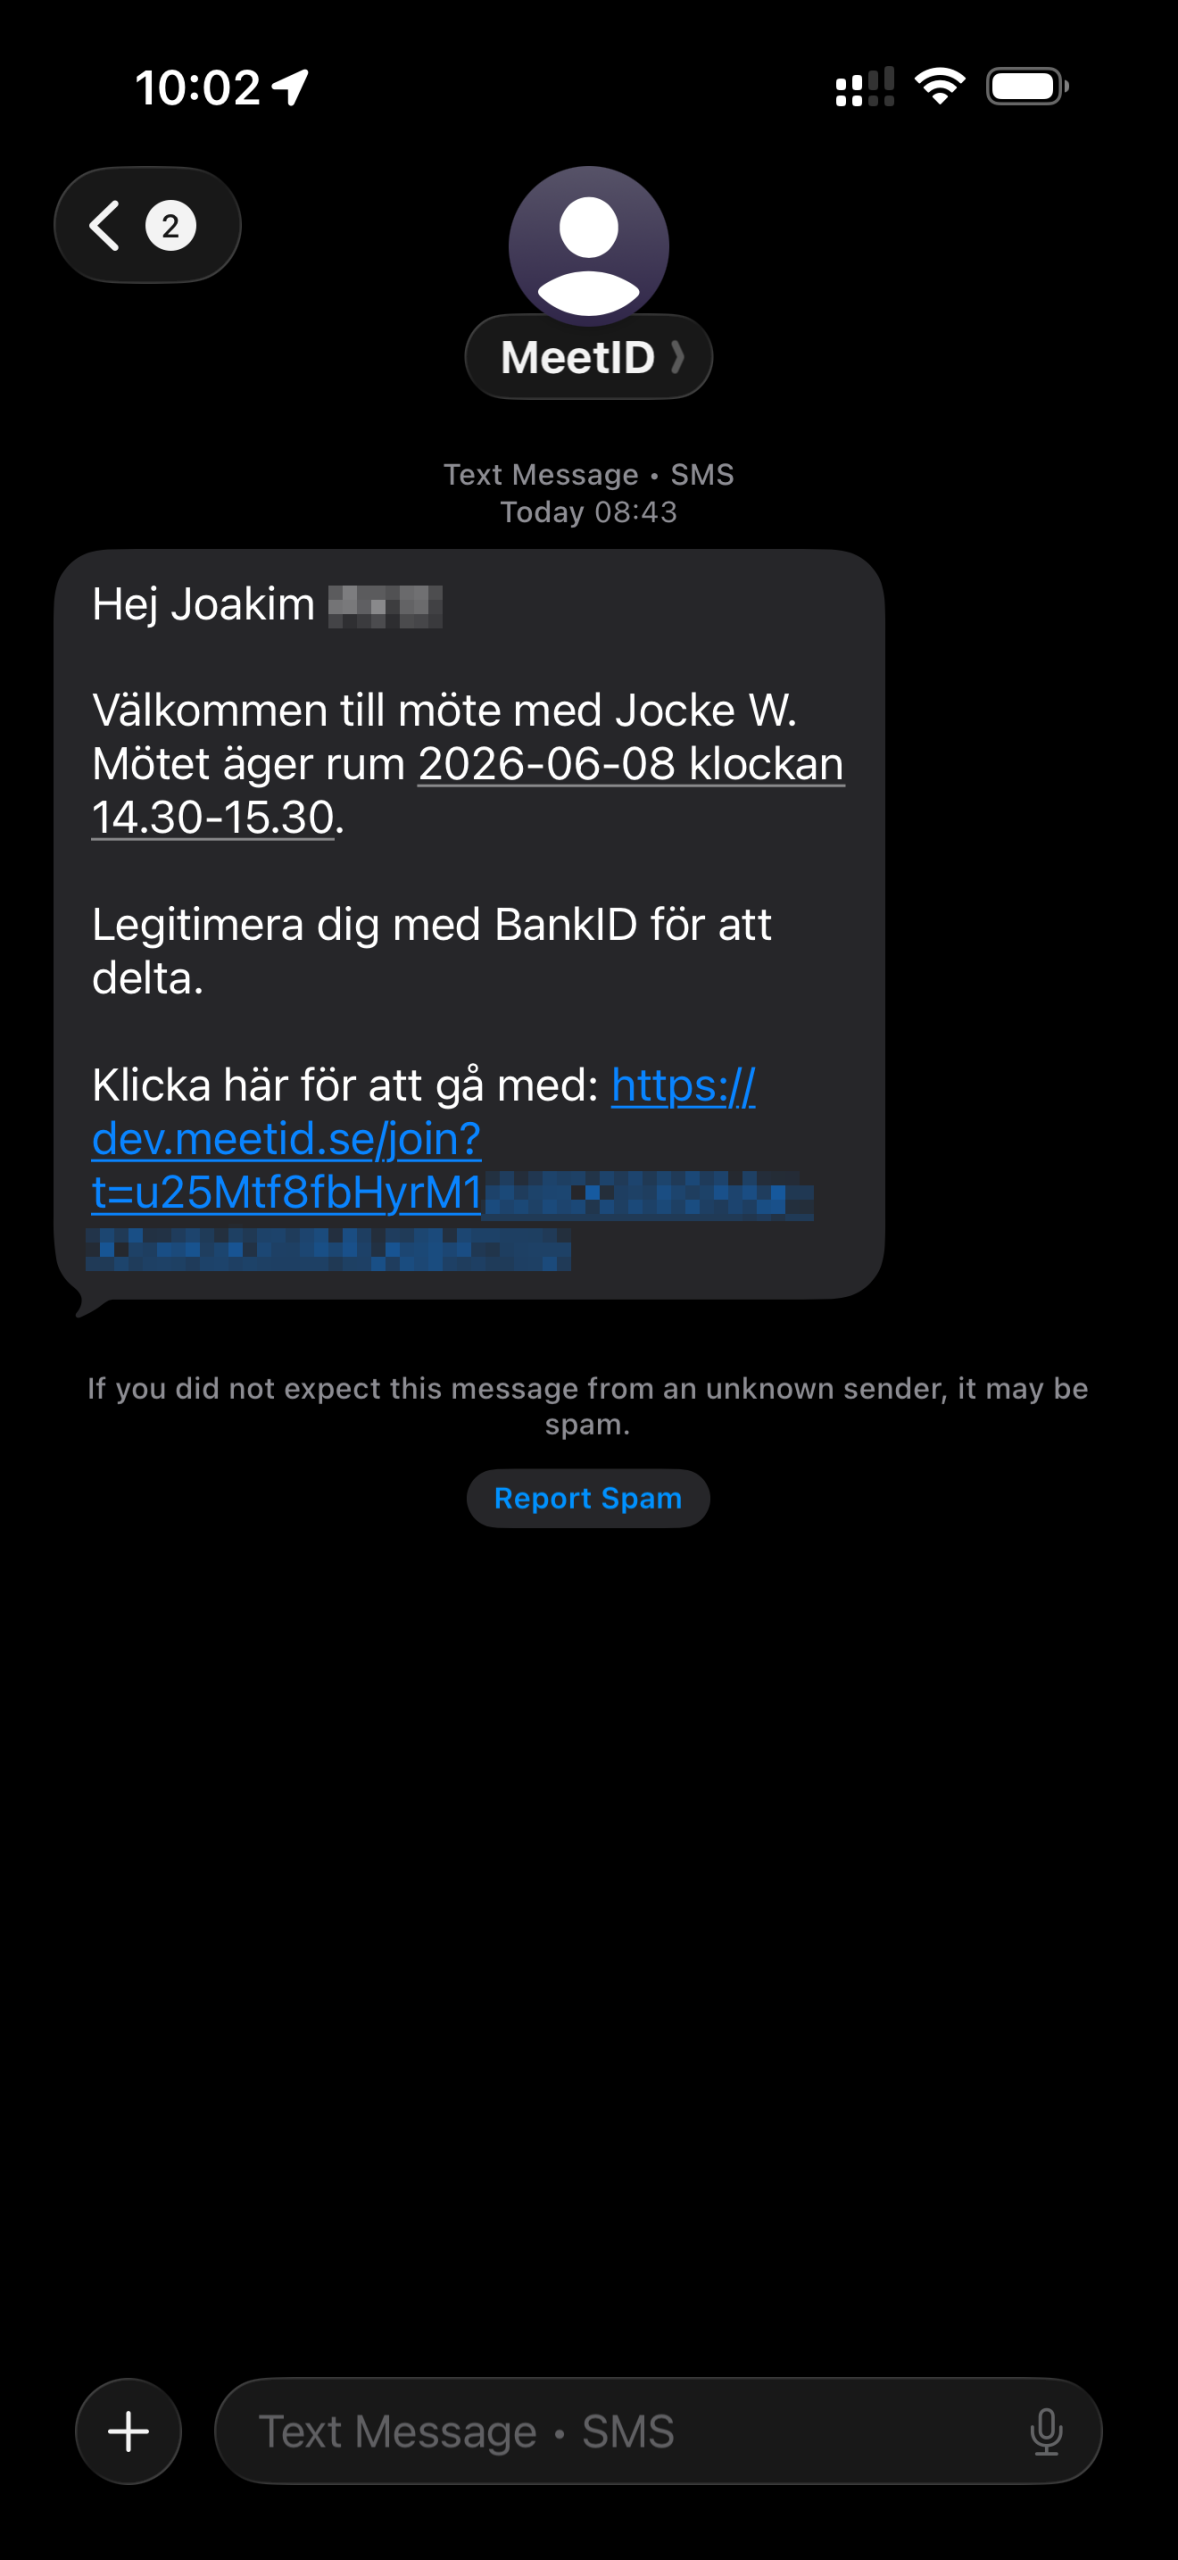
As a participant, you join the meeting via the invitation you received by email or SMS. The invitation contains information about the meeting and a personal link used to identify yourself and join the meeting.
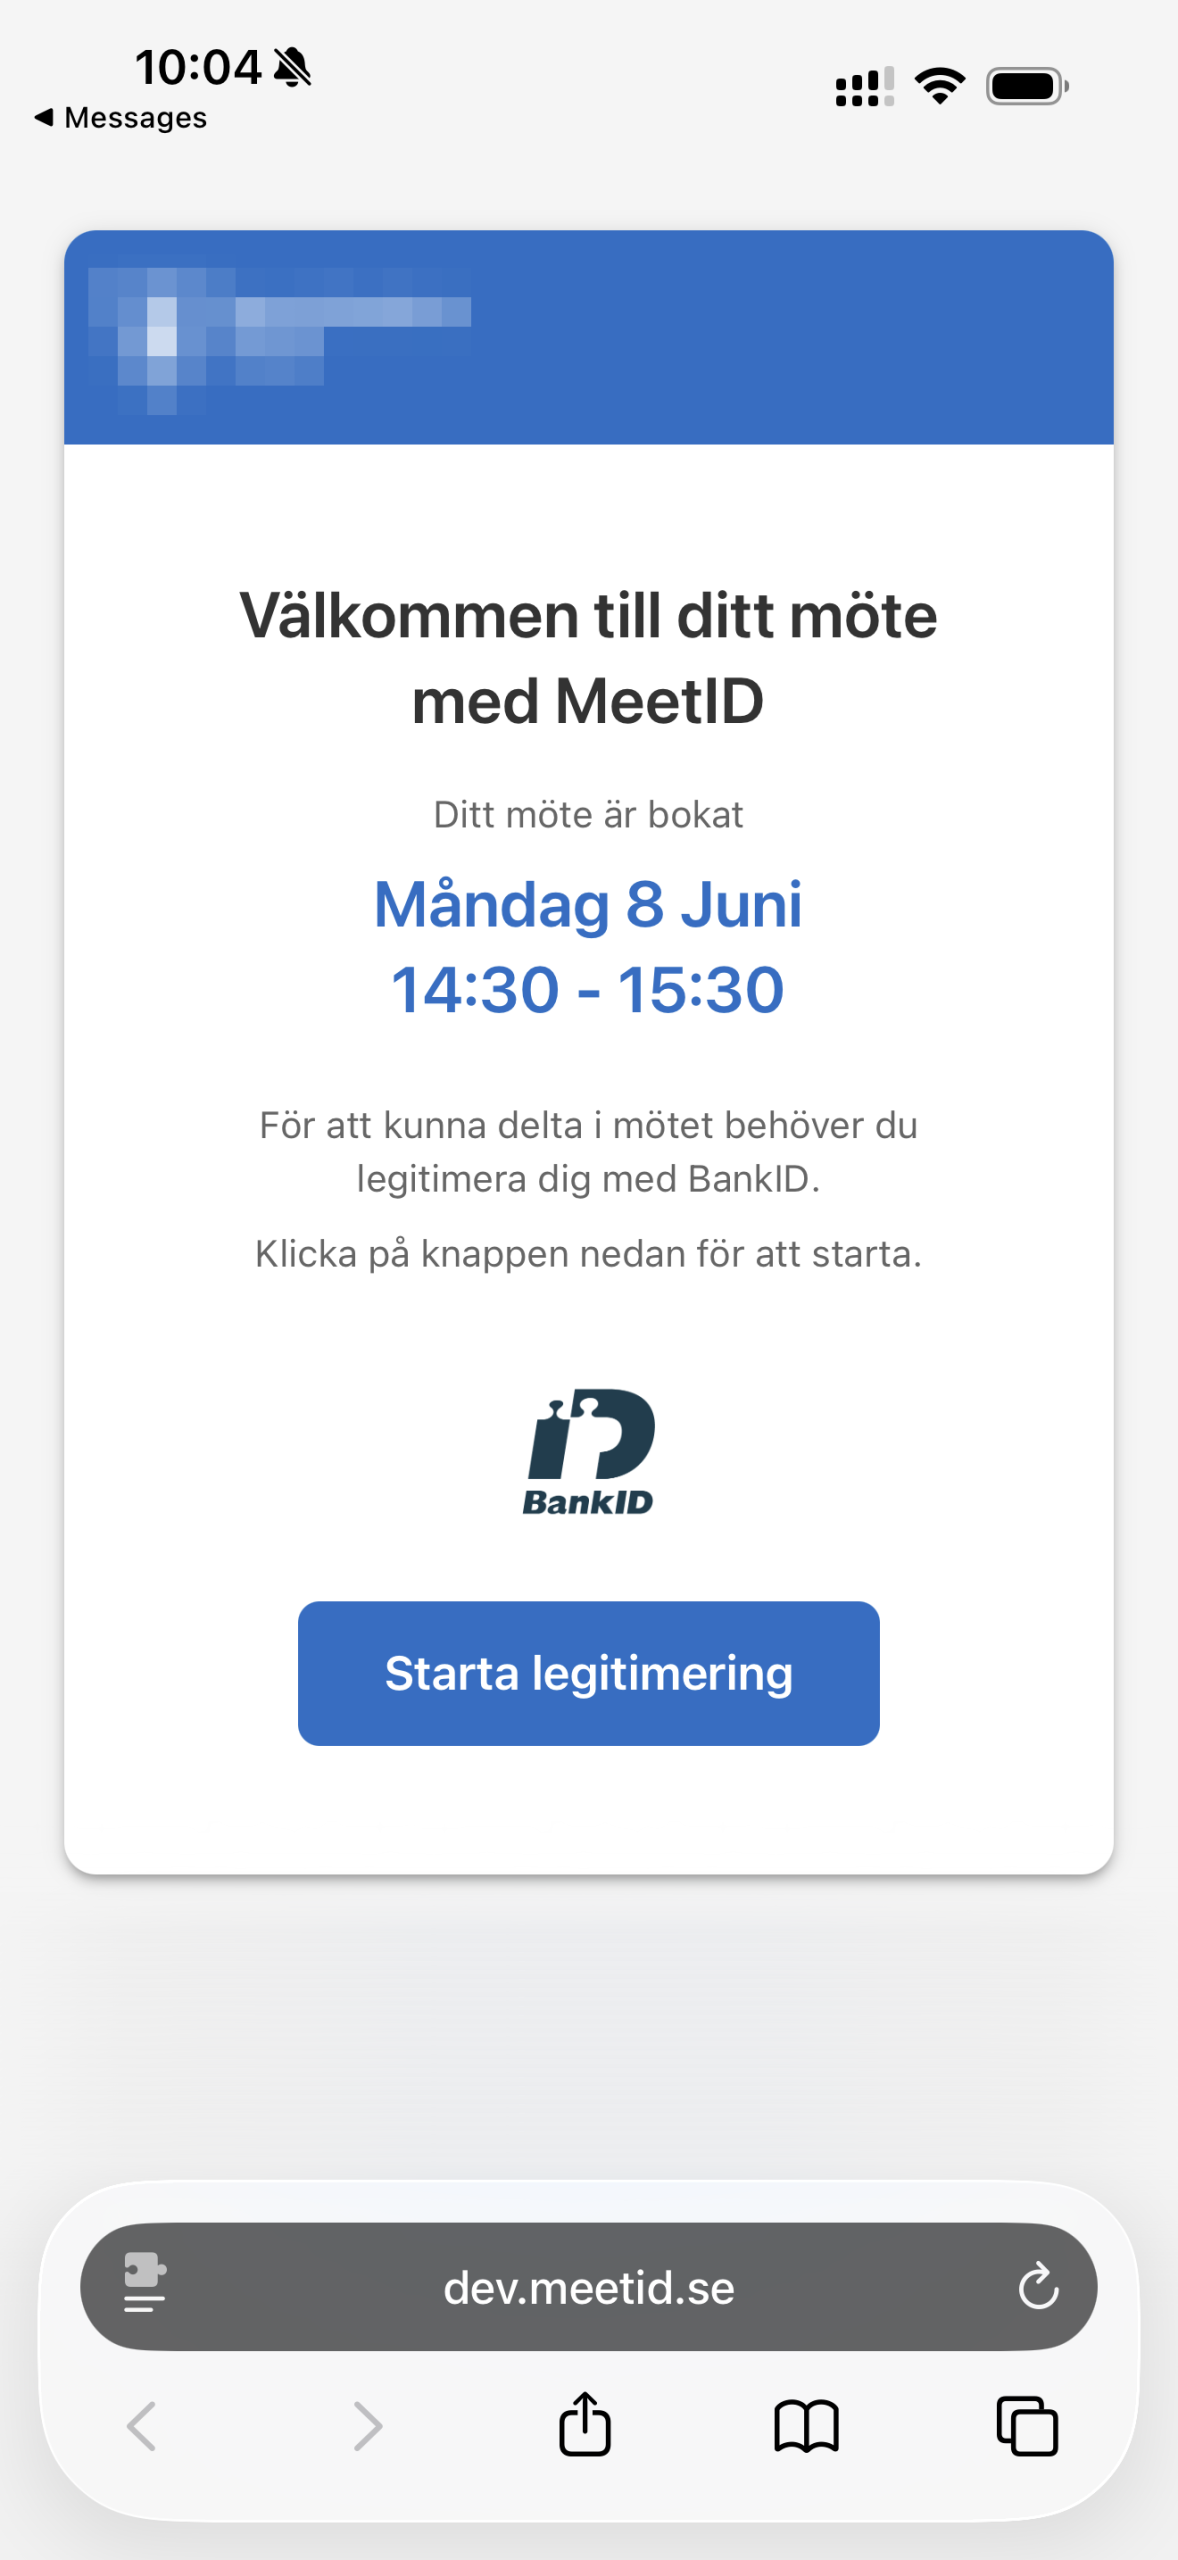
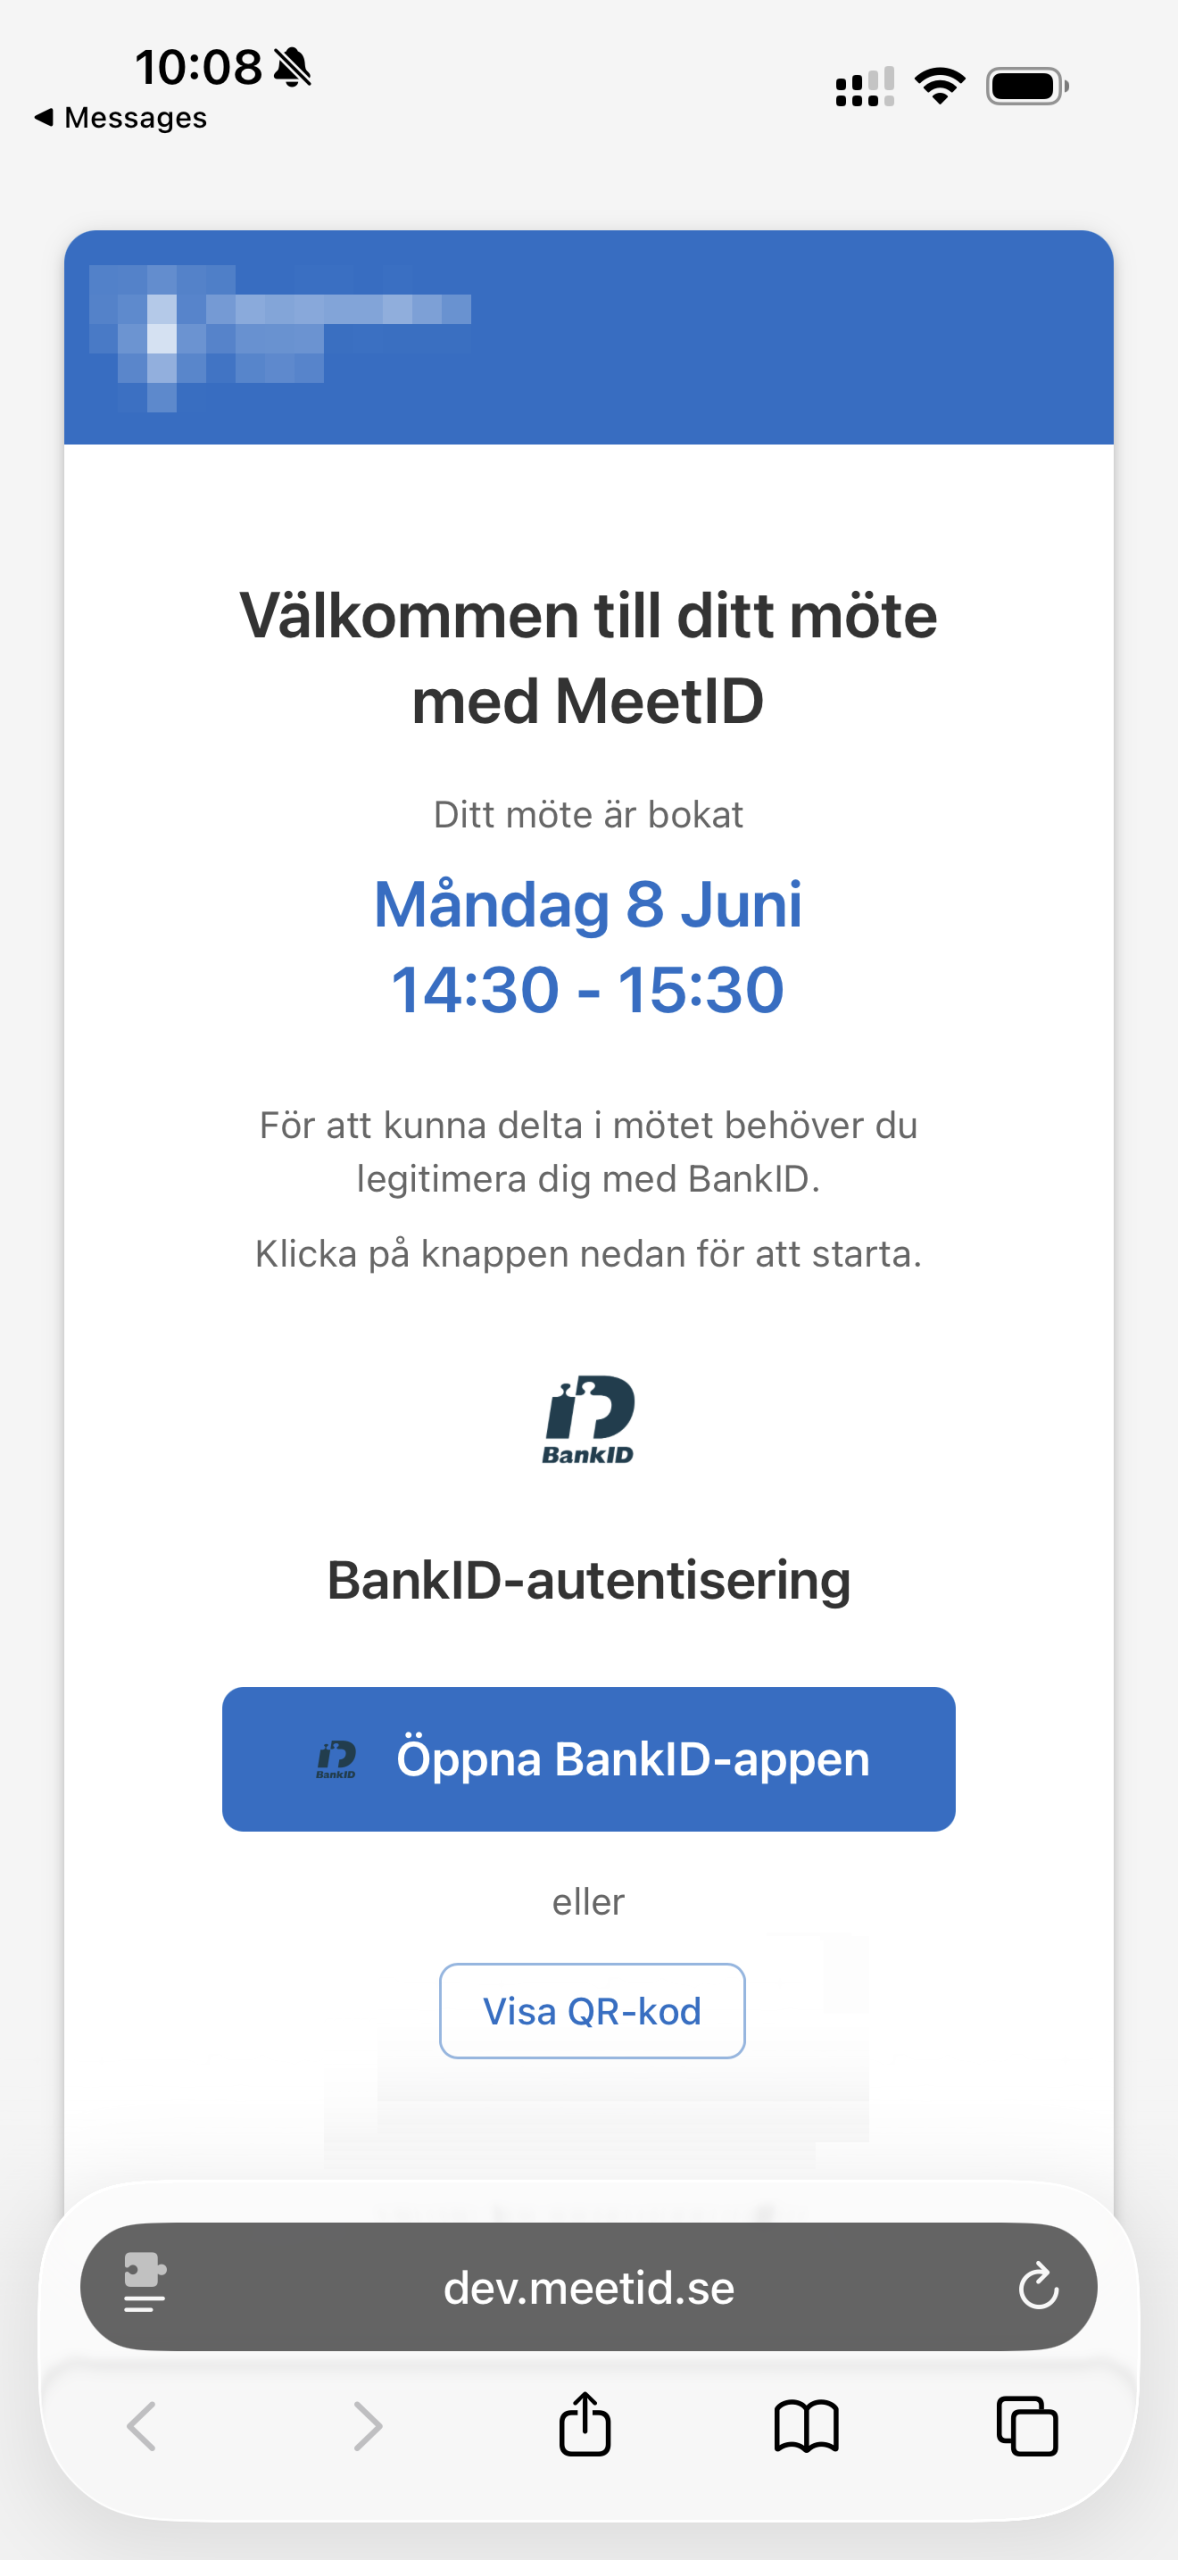
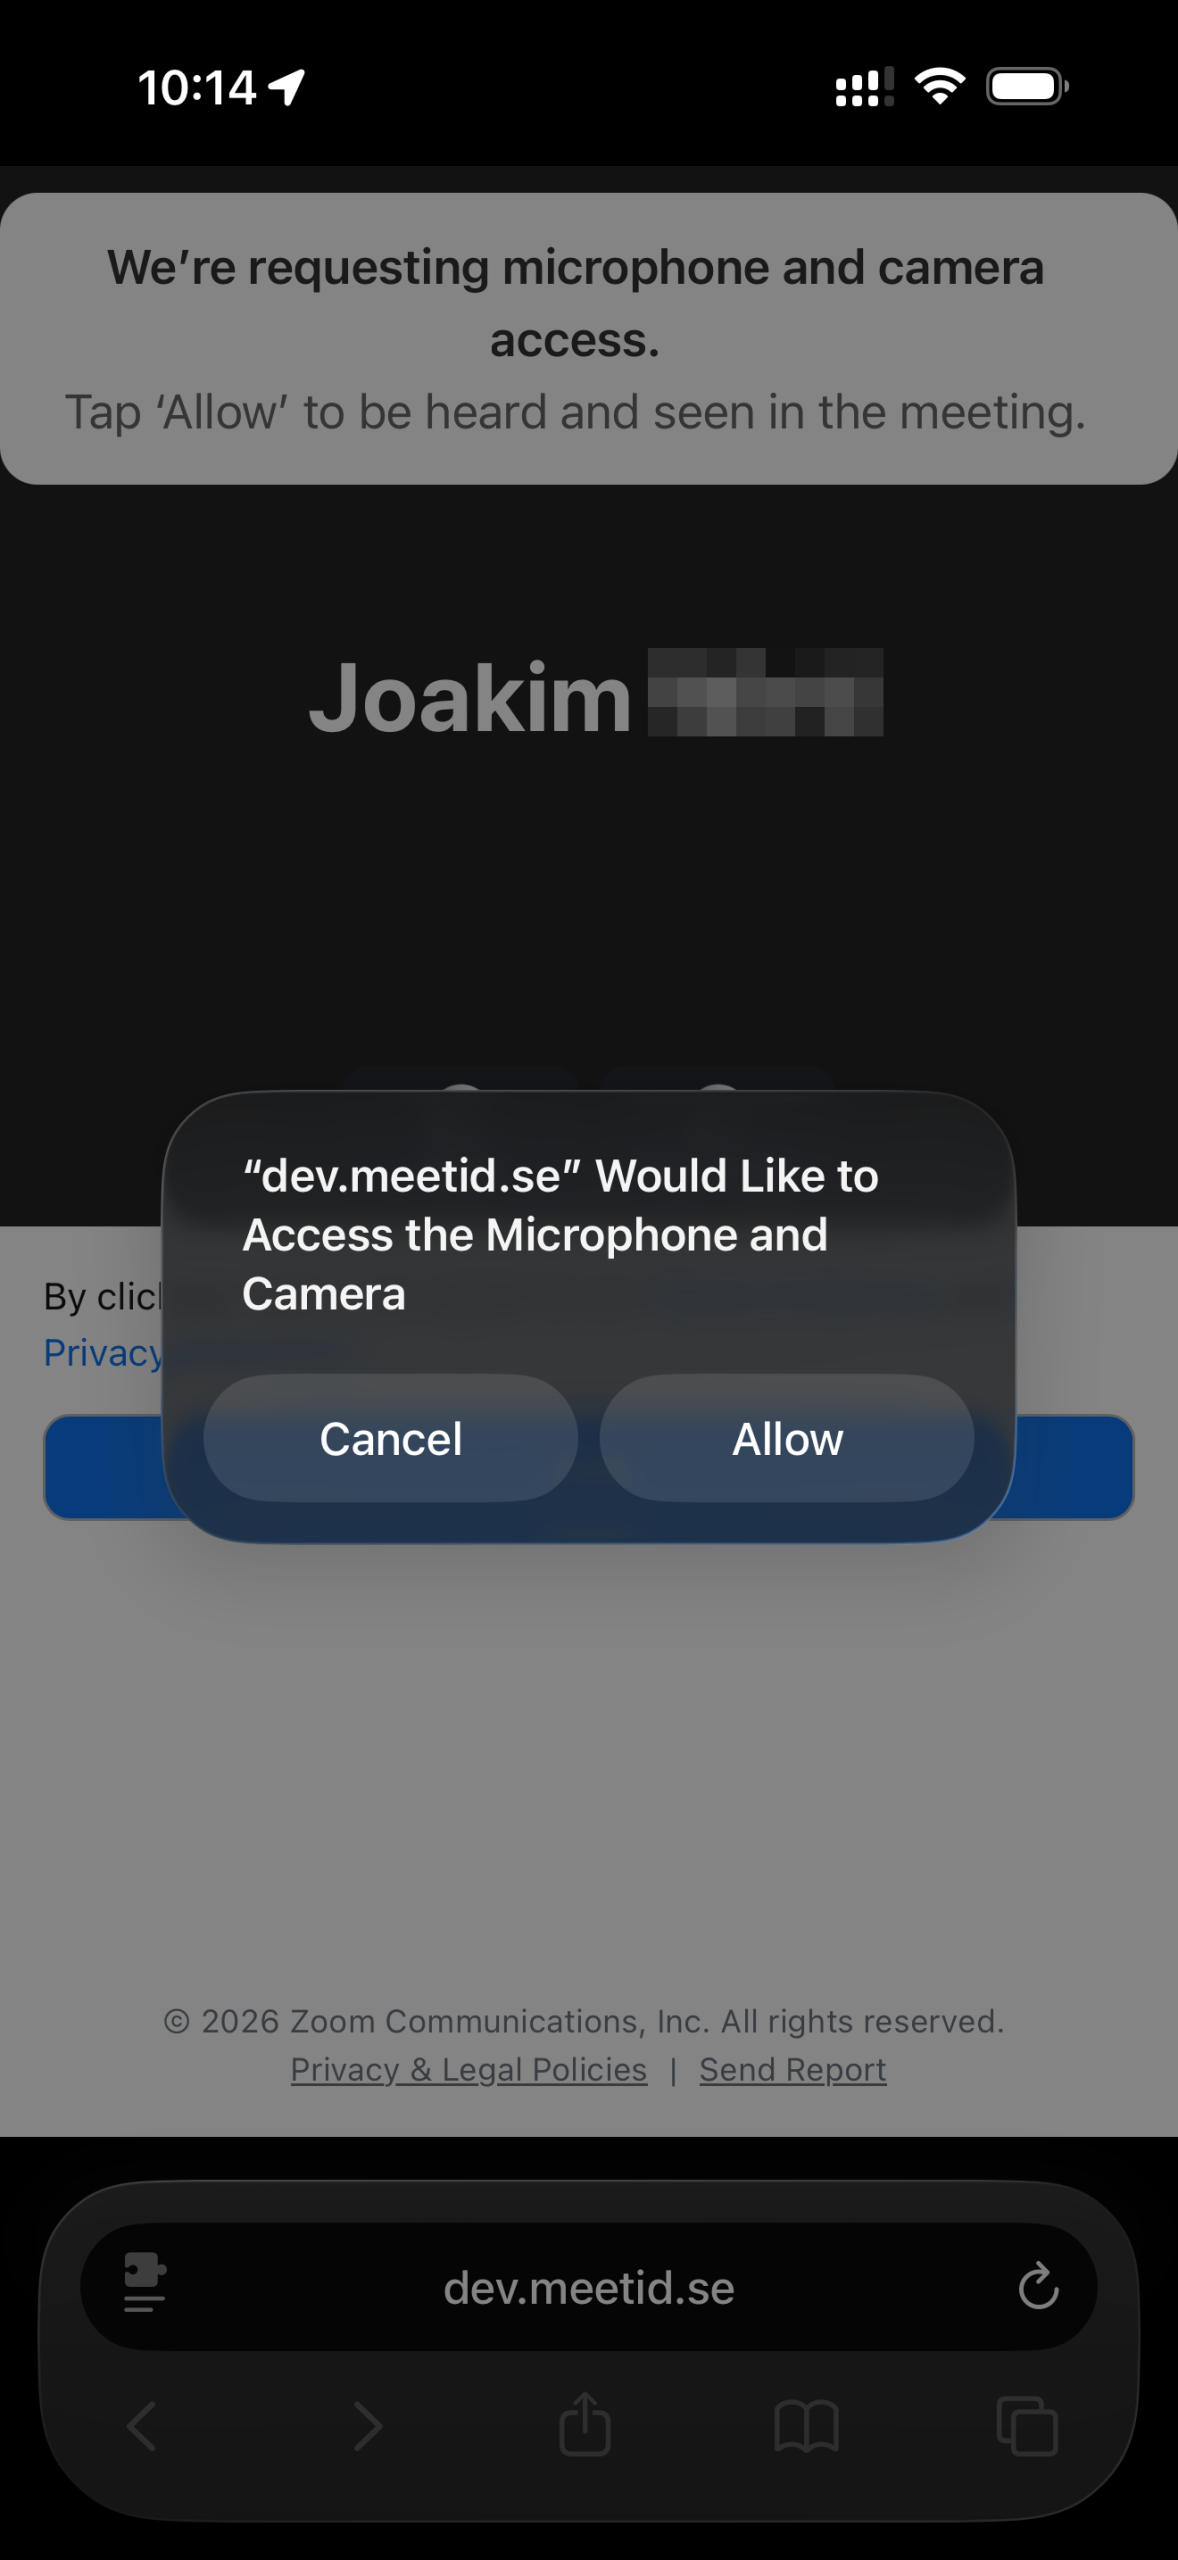
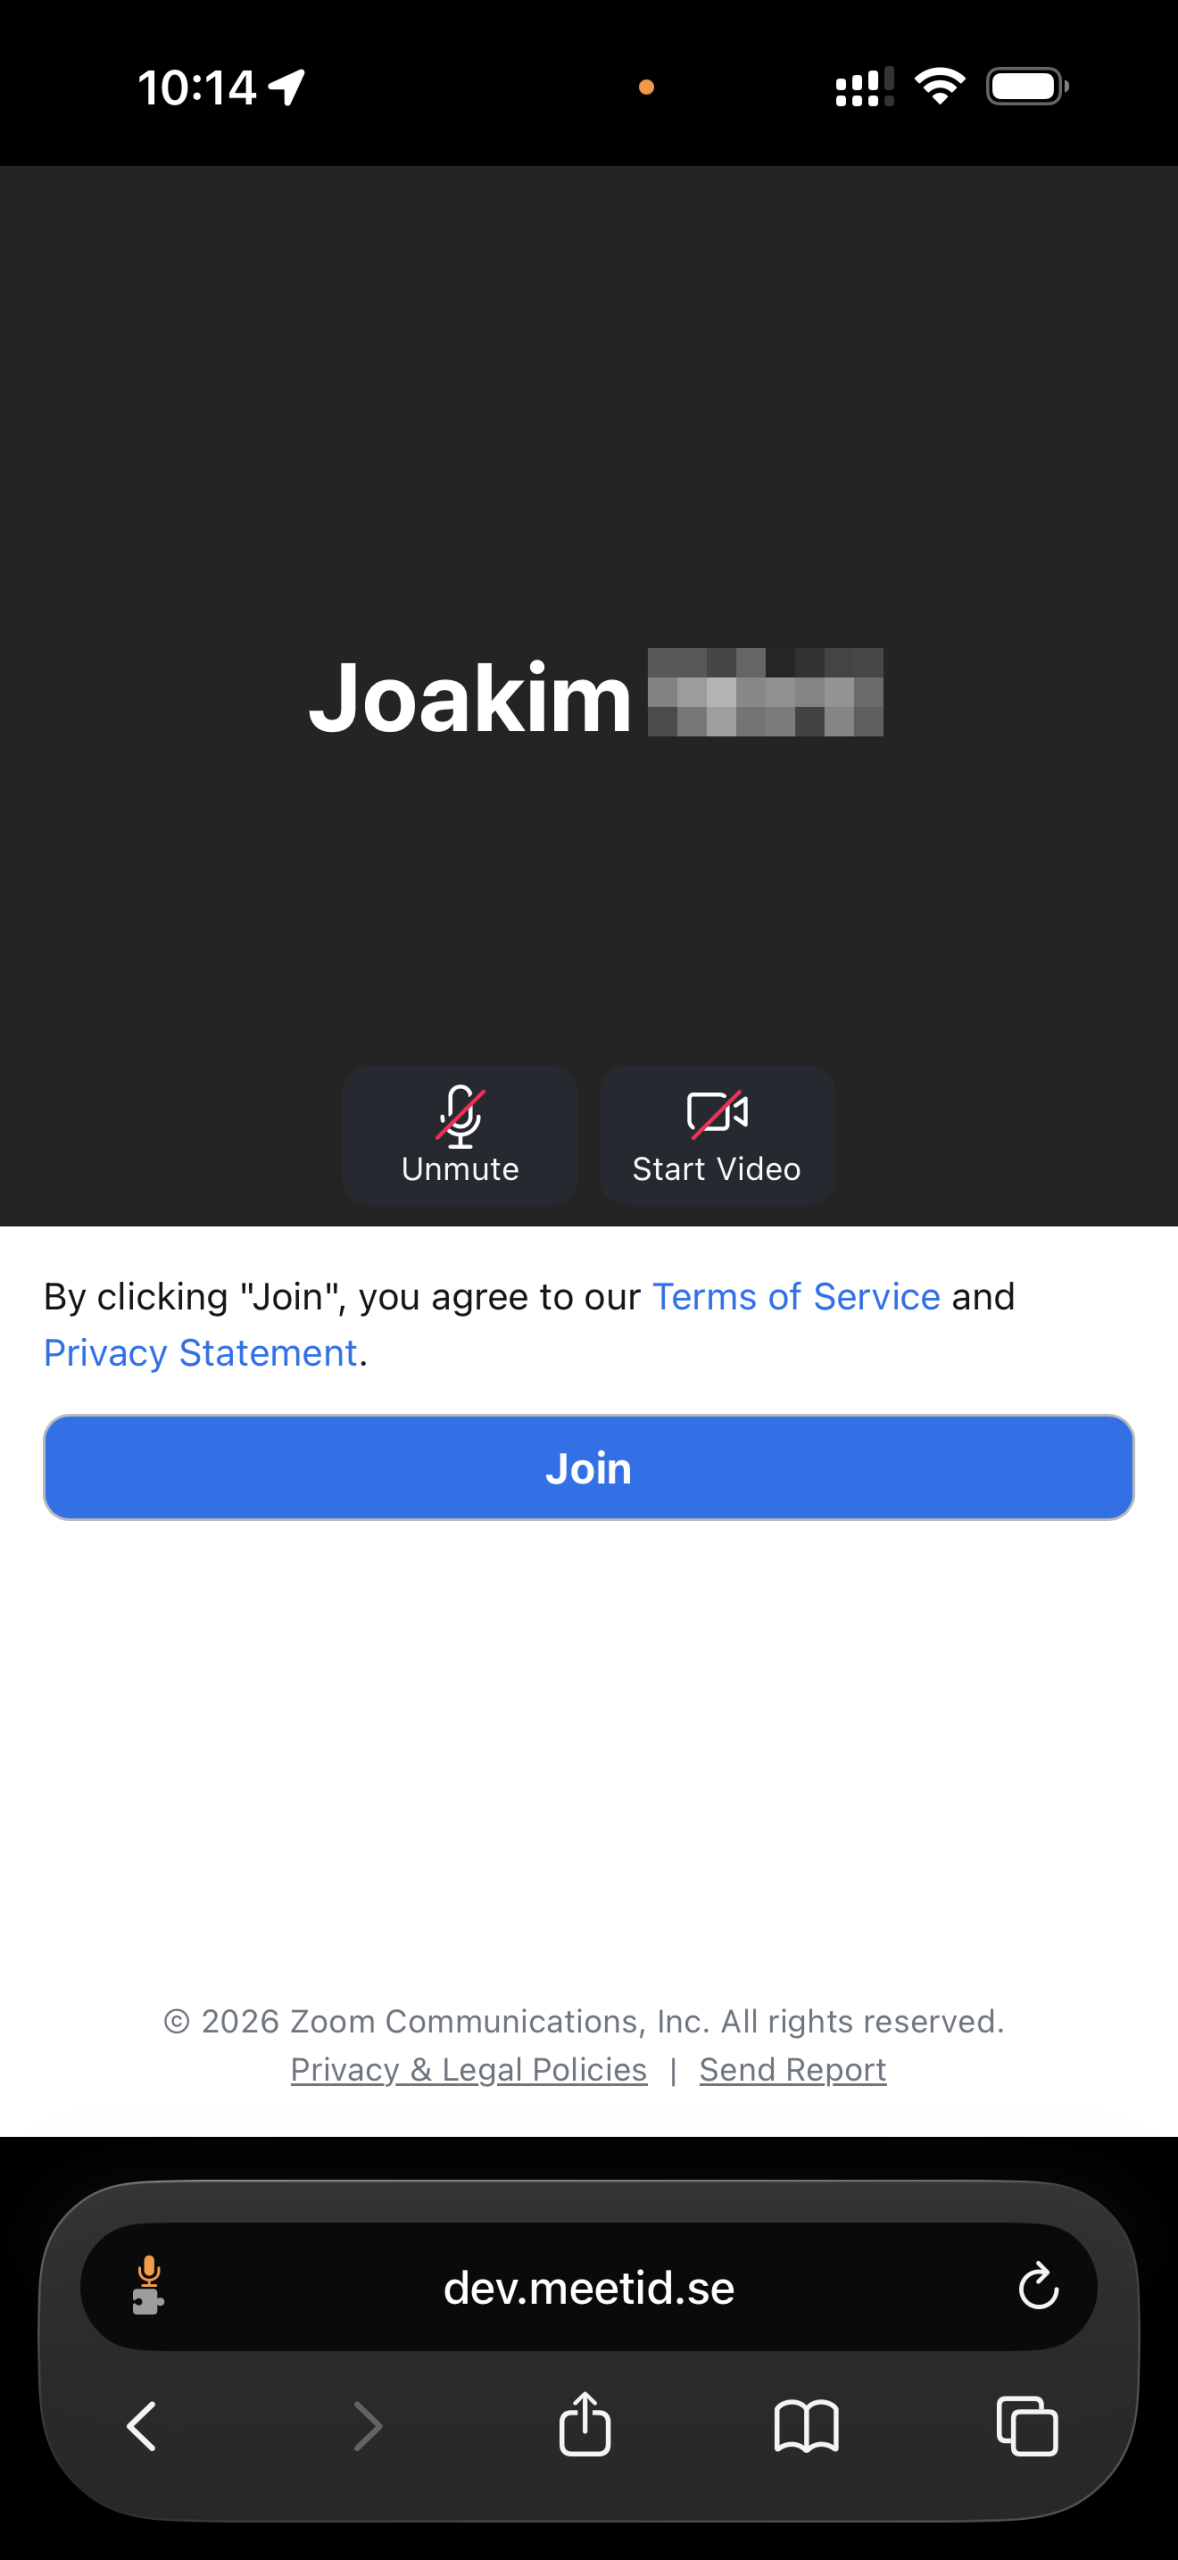
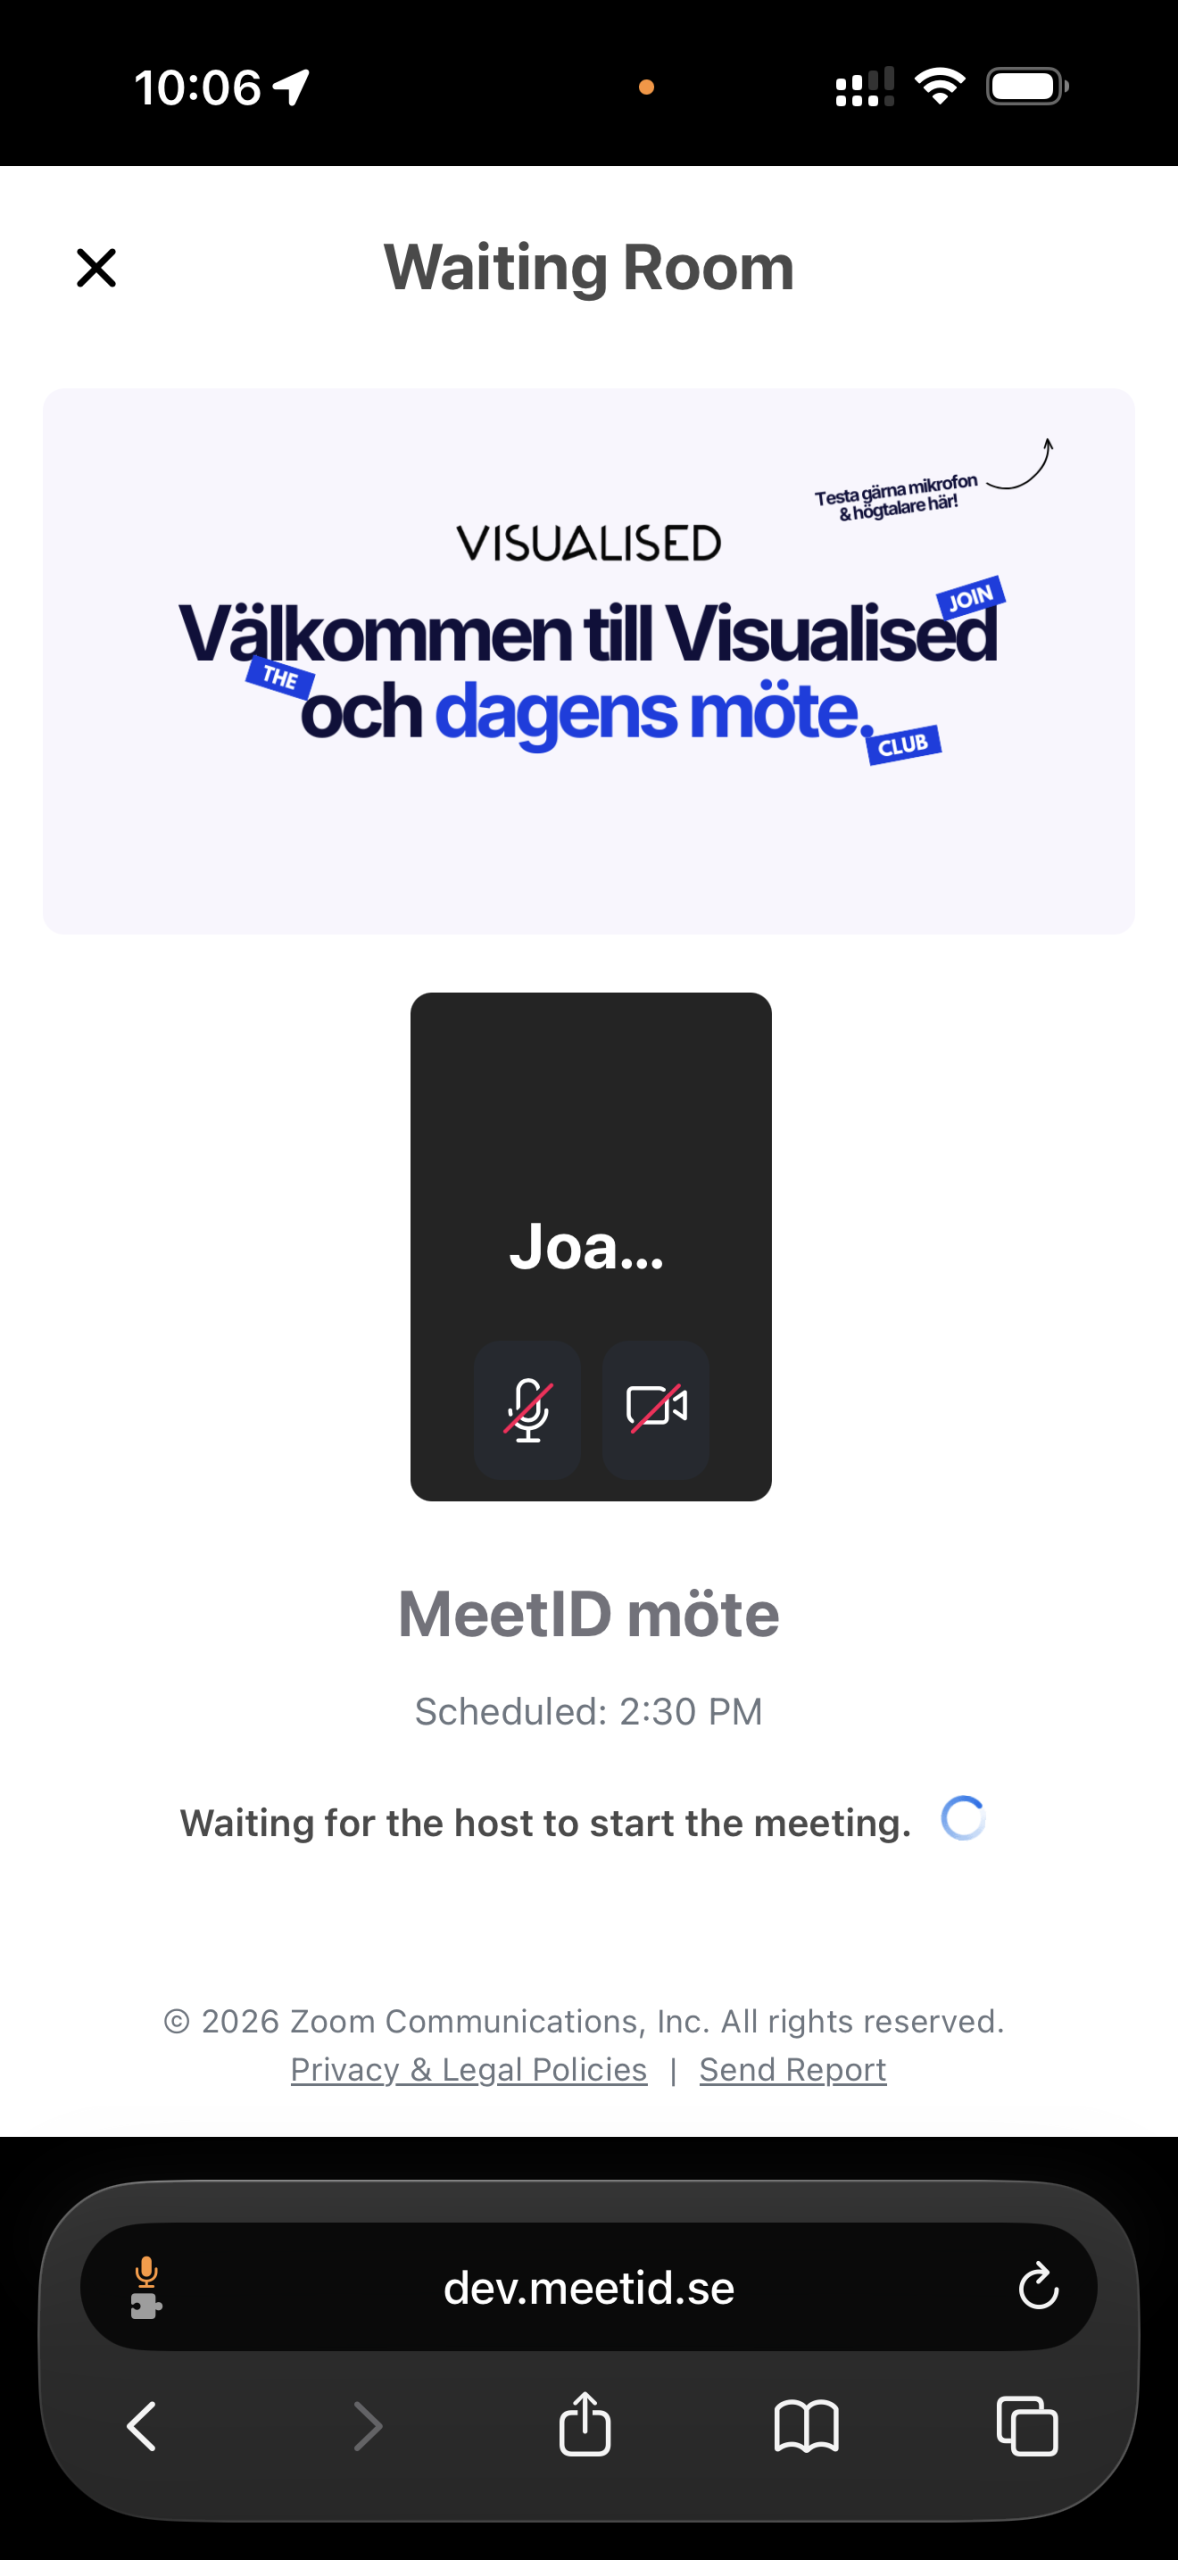
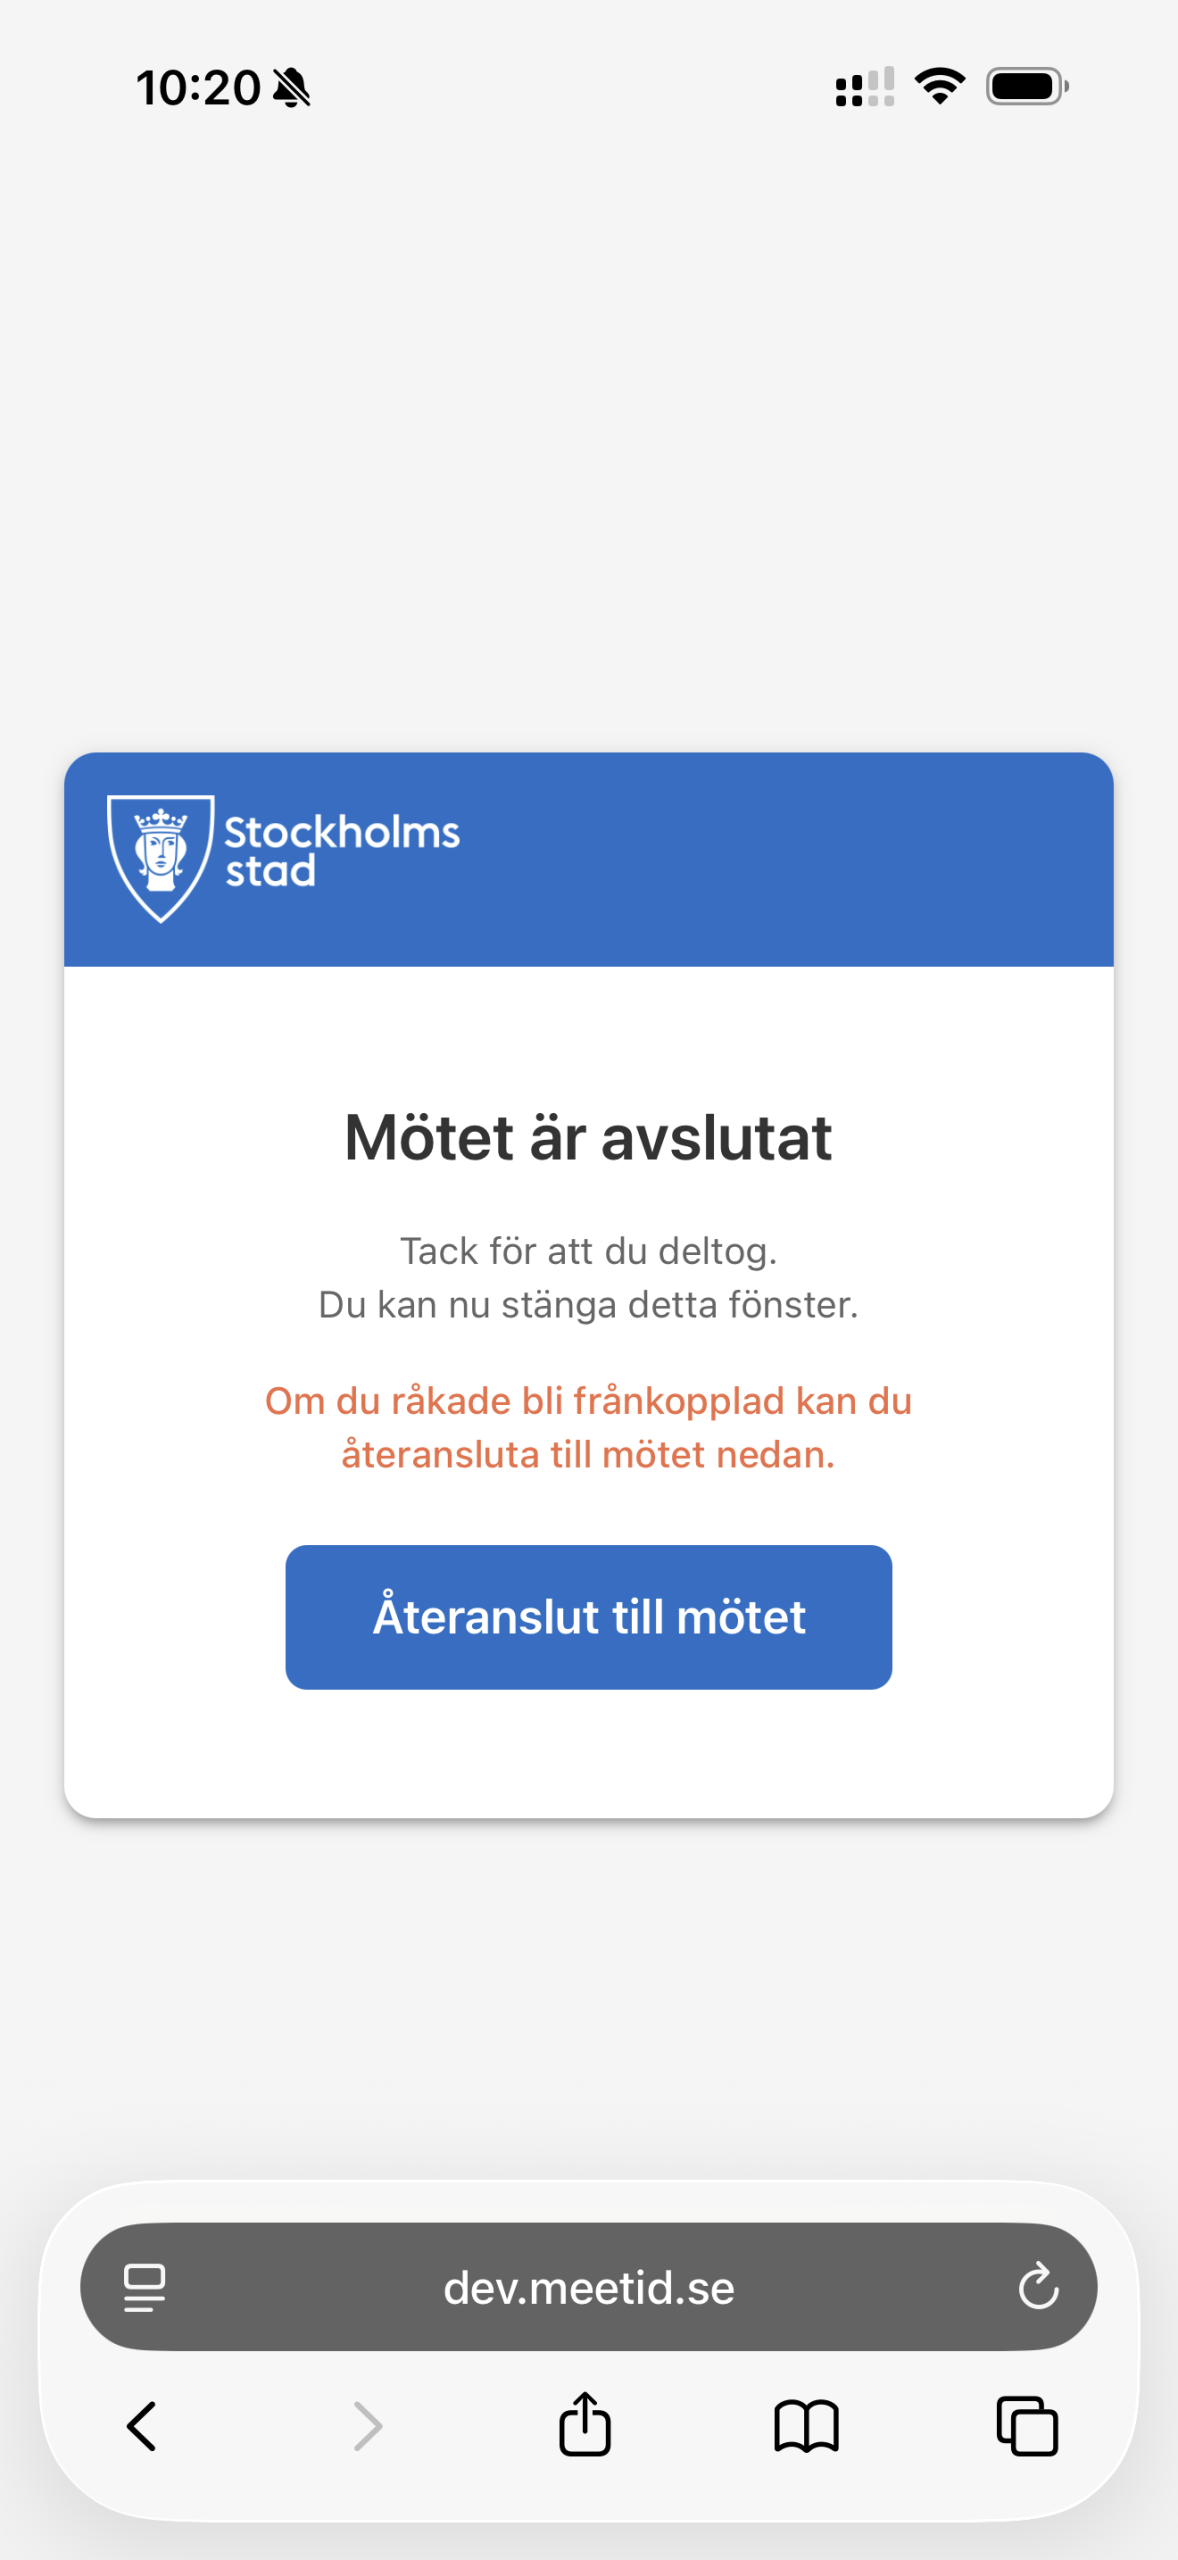
The slideshow below shows an example of how the flow can look from invitation to joining the meeting.
You do not need to open MeetID in Zoom. Follow the link in the invitation and complete the steps in the web browser.
- Open the invitation you received via email or SMS.
- Click the link in the invitation.
- A web page will open in your browser with information about the meeting.
- Verify that the date and time are correct.
- Click Start authentication.
- Authenticate yourself with the e-identification specified in the invitation; the e-identification method may vary depending on your organization. In this example, we use BankID.
- If BankID is used, click Open BankID app. You can also select Show QR code if you need to authenticate with BankID on another device.
- Follow the instructions in the BankID app and complete the authentication.
- Once authentication is approved, you will be redirected to the meeting.
- Allow camera and microphone access if the browser requests it.
- Click Join to connect to the meeting.
- If the meeting has not started yet, you will be placed in the waiting room until the meeting host starts the meeting or admits you.
- When the meeting ends, a termination page is displayed. You can then close the browser window.
- If you are accidentally disconnected, you can use the Reconnect to meeting button if the meeting is still active.
Conduct a Meeting
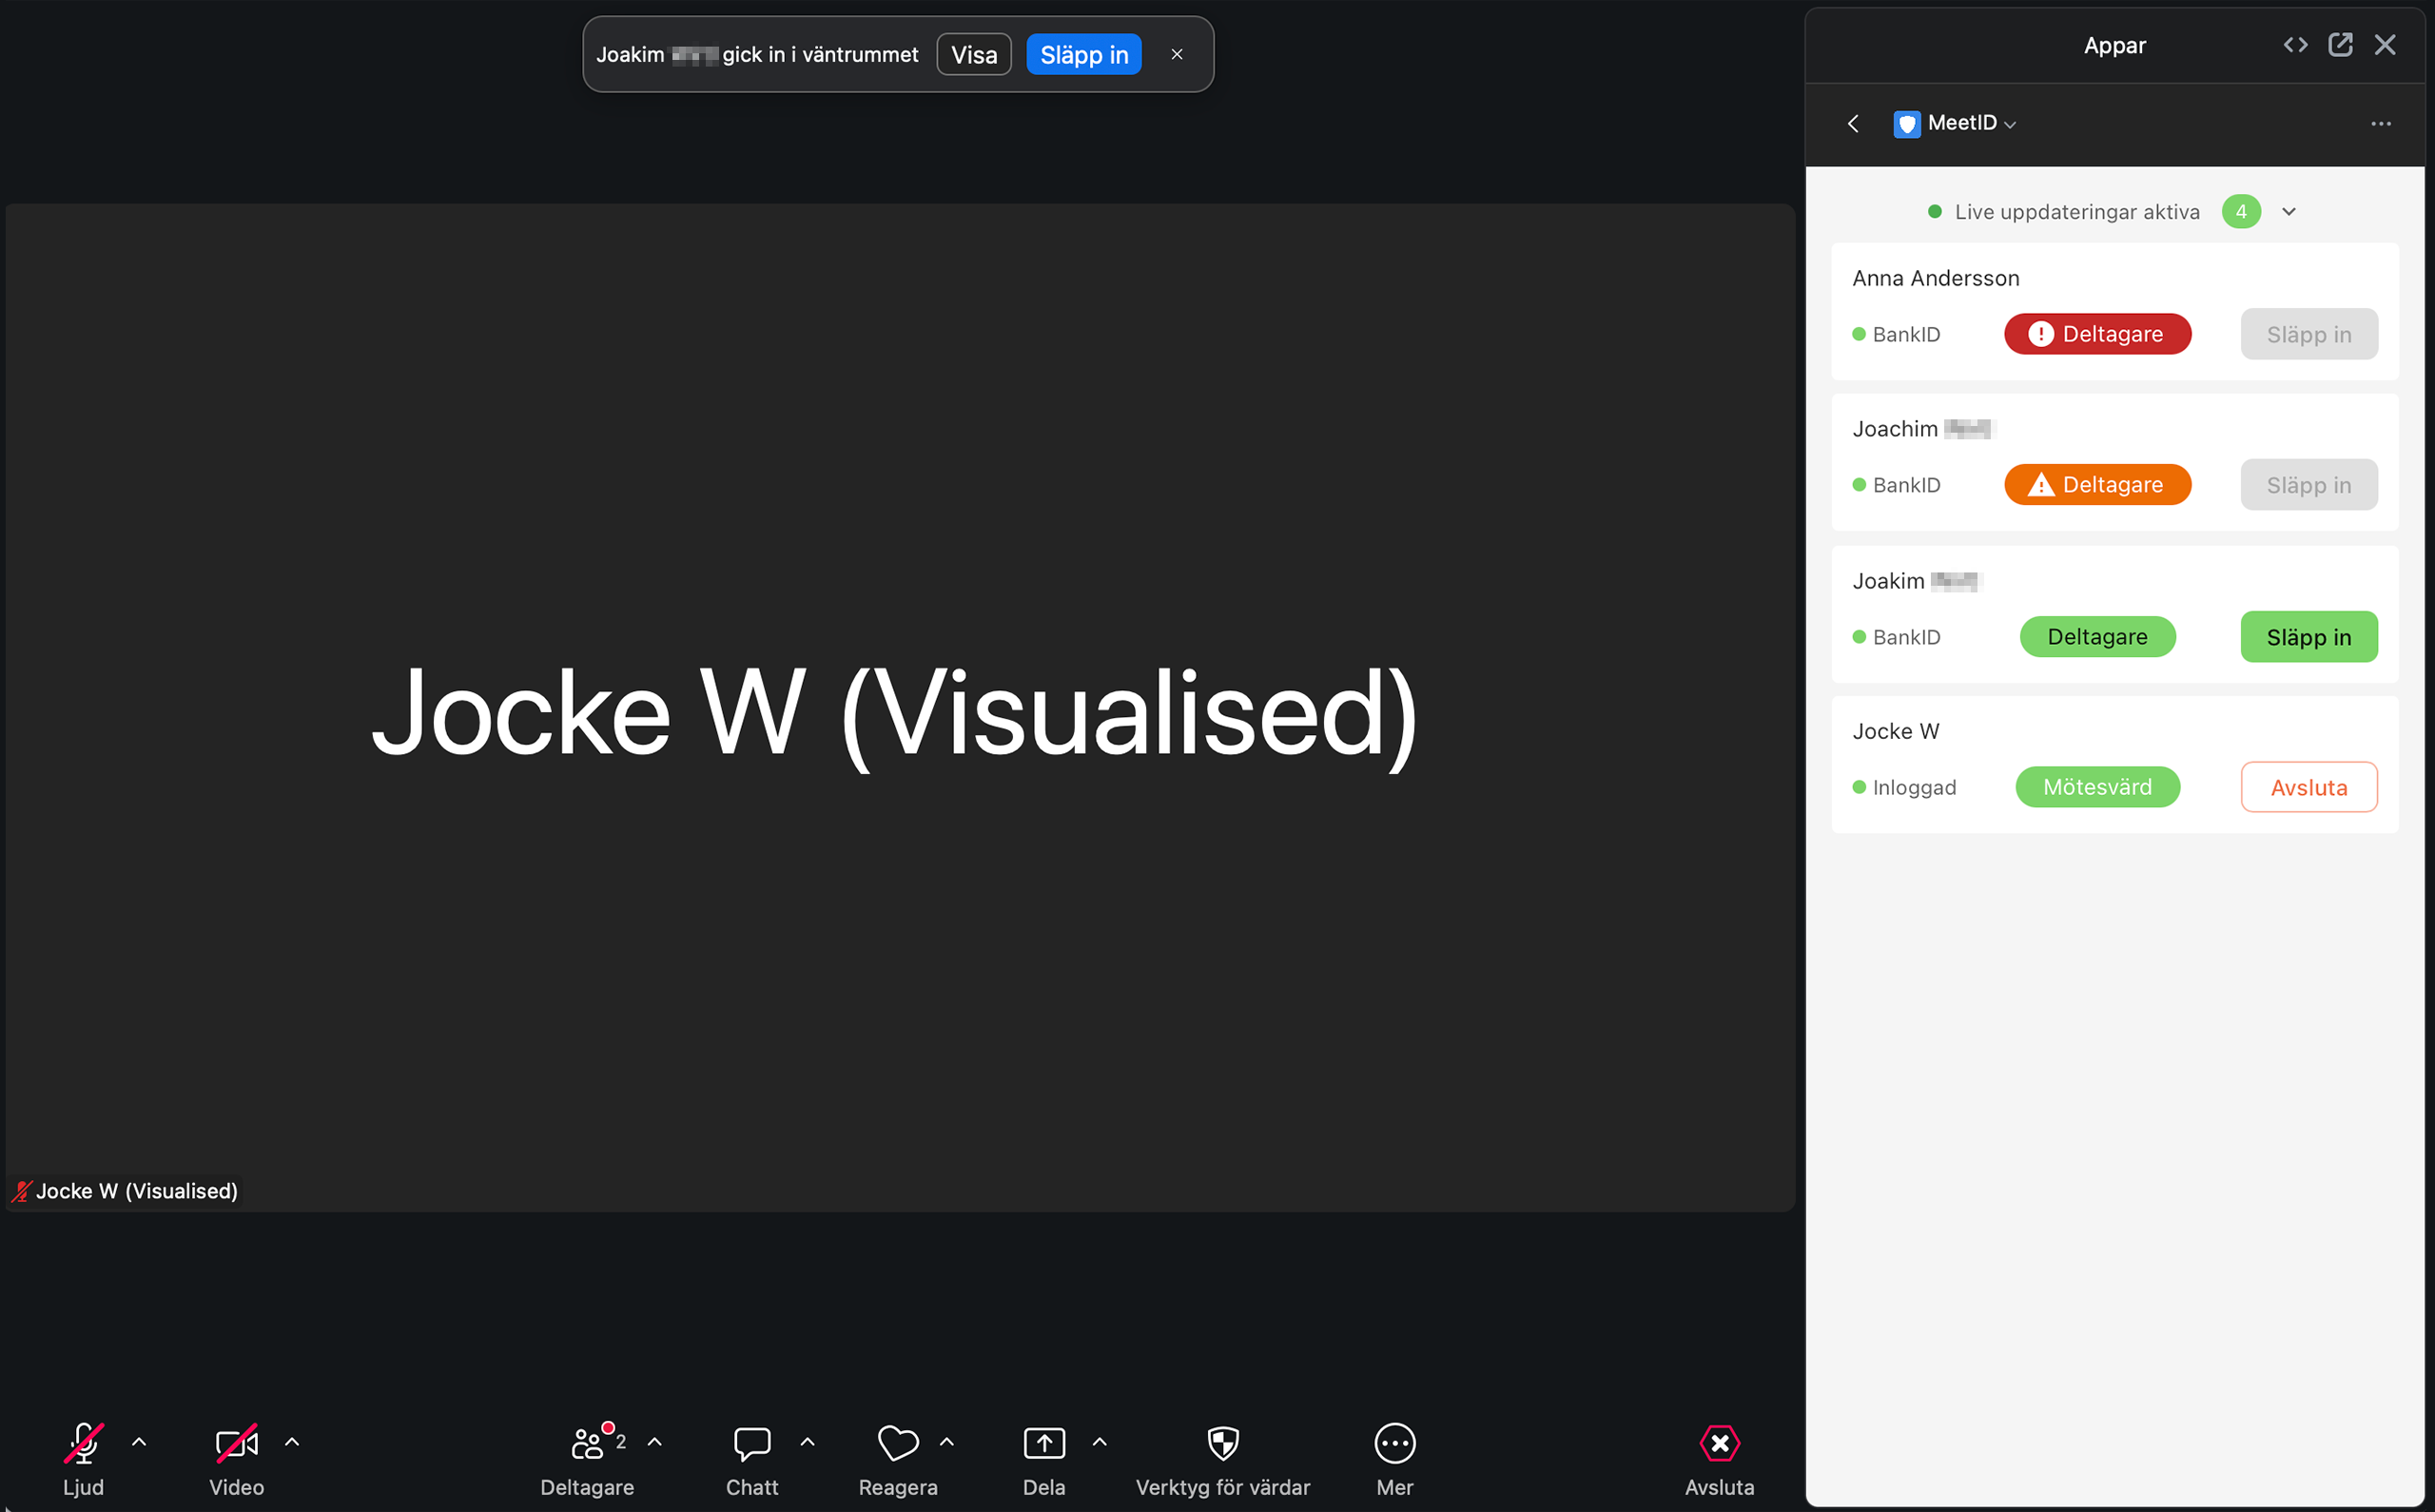
Once the meeting has started, you can use the MeetID sidebar in Zoom to monitor participant status and manage access to the meeting. The sidebar shows which participants are in the meeting, their role, and whether their authenticated identity matches the invited person.
Live updates for the meeting are displayed at the top of the sidebar. There you can follow important events, such as when a participant authenticates, is in the waiting room, is admitted to the meeting, or leaves the meeting. Events are also shown as notifications in the panel.
Below the live updates, the participant list is displayed. There you see the participants’ names, authentication method, role, and current status. See the image below.
Participant Status
Depending on the participant’s role, the status may be displayed in different ways.
| Role | Status | Explanation |
|---|---|---|
| Affected person | Green | The person is matched against the specified personal identity number. When authentication is approved, green status is displayed. |
| Contributing contact | Green | First name and last name exactly match the invited person. Example: Joakim = Joakim. |
| Contributing contact | Orange | First name or last name deviates, for example, due to spelling. Example: Joachim ≠ Joakim. |
| Contributing contact | Red | The authenticated name clearly deviates from the invited person. |
The status is used as support to assess whether the authenticated identity matches the person invited to the meeting.
Admit Participants
Once a participant has authenticated and is in the waiting room, you can admit the person to the meeting.
- Click the Admit button next to the participant in the MeetID sidebar.
- You can also use Zoom’s regular meeting controls to admit the participant.
Place Participants in Waiting Room
If you need to move a participant back to the waiting room.
- Click the Waiting Room button next to the participant in the MeetID sidebar.
- You can also use Zoom’s regular meeting controls.
End the Meeting
When the meeting is over, end the meeting from Zoom.
- Click the End button in the panel to end the meeting.
- You can also use Zoom’s regular meeting controls.
Remove MeetID
When MeetID is removed from Zoom, the app can no longer be used to create or manage secure authenticated meetings from the current Zoom account. MeetID will no longer be available under Apps in the Zoom client for you as a user.
To remove MeetID, you need to be logged into Zoom with the account where the app is installed. Removal is done via the Zoom App Marketplace, so first open a web browser and go to Zoom’s App Marketplace. Then follow the steps below.
- Open a web browser and go to https://marketplace.zoom.us.
- Click Manage.
- Go to Added Apps.
- Locate MeetID in the list.
- Click Remove.
- Confirm that you want to remove the app.
- Go back to your Zoom client and verify that MeetID is uninstalled.
Removing the app does not automatically delete all previous information. Data that needs to be saved according to agreements, security routines, or applicable regulations will continue to be handled in accordance with MeetID’s service agreement, general terms and conditions, and privacy policy.
Contact Support if you have questions about removal, access, or management of user data.
Troubleshooting
In the Troubleshooting section, you will find guidance for common issues that may arise when installing or using MeetID in Zoom. Go through the points below step-by-step and first check the most common causes.
If the problem persists after following the instructions, you can contact Support for further assistance.
The Apps menu option is missing in Zoom.
If the Apps menu option is not directly displayed in the Zoom toolbar, it may be hidden under the More menu.
- Click More at the bottom left of the Zoom client.
- Locate the Apps option in the menu that opens.
- Right-click Apps and select Pin to Toolbar.
- Verify that Apps is now displayed directly in the toolbar.
- Open Apps and verify that MeetID is available.
Participant does not receive an invitation.
First, verify that the email address or phone number is correctly entered. If the information is incorrect, the invitation needs to be sent again with the correct contact details.
If the invitation was sent via email, the participant should also check spam, other inboxes, and any security filters.
If the participant still has not received the invitation, try sending the invitation again or contact Support for further assistance.
Participant cannot join the meeting.
Verify that the participant is using the latest meeting link that was sent out. If multiple invitations have been sent, an older link may be outdated.
The participant also needs to have completed authentication before access to the meeting can be granted. Ask the participant to go through the authentication flow again and verify that it completes without an error message.
It may also help to try a different web browser or verify that the browser is not blocking necessary permissions.
If the problem persists, you can try sending a new invitation or contact Support for further assistance.
Contact Support
If the problem persists after you have gone through the troubleshooting steps on this page, you can contact support for further assistance.
To help you as quickly as possible, it is helpful if you describe what happened, what steps you have already tried, and if any error message is displayed. Please also indicate whether the problem concerns MeetID installation, access to the app in Zoom, participant invitation, or joining a meeting.
You can find contact methods, opening hours, and information about response times on our Support Page.